
 Having played almost nothing but Seven Years War and written about nothing but tricorn hat-lace in recent months, many readers of this blog will be relieved to know that we finally played something different at club last week! 🙂
 I write a lot of scenarios for various periods, but for a variety of reasons some of them never get played. One such scenario is ‘John Fuller’s Stand’, which I first wrote in 2009. It’s been on the Battlefront: WWII (Fire & Fury Games) Scenario Page all that time and sadly, I’ve never played it and have never heard of anyone else playing it! So after last month’s epic Leuthen refight and needing to do something far-removed from tricorns, I thought it was time to dust it off for a Thursday-night club-game.
This is a slightly simplified version of the scenario presented on the Battlefront: WWII page, covering just the first day of what was a two-day battle.
The action fought by Major John Fuller’s ‘C’ Company of 152 (Indian) Parachute Battalion on a mountain spur with the unimaginative name of Point 7378 is a largely forgotten, yet critical part of the story of the Battle of Kohima and the Siege of Imphal. The sacrifice of this heroic company of (British-officered) Indian Paras gave time for the rest of 50th Indian Parachute Brigade to establish a defensive position a few miles away at the village of Sangshak. The brigade’s subsequent sacrifice at the Battle of Sangshak in turn gave time for the defensive position at Kohima to be established and the successful defence of Kohima led directly to the successful relief of Imphal and the ultimate defeat of the Imperial Japanese Army in Burma. It’s difficult to think of another small-unit action that had such a profound impact on the course of the Second World War.
 Historical Background
‘By mid-morning the enemy’s fire slackened considerably. Suddenly, from the top of the hill, a small group of about twenty men charged down towards us, firing and shouting in a counter-attack. However, between us was a wide ravine which they had been unable to see, and of those who were still alive, some fell into it in their rush onwards while the rest had no choice but to surrender. A few escaped. At the very top of the position an officer appeared in sight, put a pistol to his head and shot himself in full view of everyone below. Our men fell silent, deeply impressed by such a brave act… At Point 7378 the 3rd Battalion suffered 160 casualties in the action, with one company and two platoon commanders killed and another four officers wounded… The enemy had resisted with courage and skill.’
– Extract from diary of Colonel Utata Fukunaga, commanding the Imperial Japanese 58th Infantry Regiment and found on his body at Kohima.
![]() If the British-Indian XIVth Army is the ‘Forgotten Army’, the Battle of Sangshak is undoubtedly the ‘Forgotten Battle’ of the Forgotten Army: Surrounded by a fanatical enemy, unsupported, running low on water, ammunition and men and without hope of relief, the 50th Indian Parachute Brigade, along with elements of the 23rd Indian Division, held out for several days, withstanding assault after assault before finally breaking out to escape in small groups. Without this battle, the Japanese 31st Division would have reached Kohima long before the famous defence there could be established and history might have been very different. There certainly would not have been a heroic defence of Kohima and relieving the Siege of Imphal would have been considerably more difficult.
If the British-Indian XIVth Army is the ‘Forgotten Army’, the Battle of Sangshak is undoubtedly the ‘Forgotten Battle’ of the Forgotten Army: Surrounded by a fanatical enemy, unsupported, running low on water, ammunition and men and without hope of relief, the 50th Indian Parachute Brigade, along with elements of the 23rd Indian Division, held out for several days, withstanding assault after assault before finally breaking out to escape in small groups. Without this battle, the Japanese 31st Division would have reached Kohima long before the famous defence there could be established and history might have been very different. There certainly would not have been a heroic defence of Kohima and relieving the Siege of Imphal would have been considerably more difficult.
But even before the Battle of Sangshak, a chain of events began that was to lead to the successful defence of Kohima…
The 50th Indian Parachute Brigade was formed in 1942. The long-term plan for the brigade was that it would be the spearhead for an attempt to retake Malaya and Singapore from the Japanese (a plan that would become the much-delayed Operation ‘Zipper’). Its three constituent Parachute Battalions were formed from volunteers from throughout the Indian Army as well as the British Army in India. The 151st Parachute Battalion (151 Para) was formed from British volunteers, the 152nd Battalion (152 Para) was formed from Indians and the 153rd Battalion (153 Para) was formed from Gurkhas. However, 151 Para soon found itself shipped off to the 1st Airborne Division in the Mediterranean (being renumbered 156 Para as a counter-intelligence measure) and a new 154 Para, was formed from the 3/7th Gurkhas, veterans of 17th Indian Division’s long fighting retreat from Burma in 1942 and who had unanimously volunteered en masse for the Paras.
 However, some Gurkhas clearly didn’t know what they were getting into. A group of NCOs reported to their company commander that jumping from 600 feet seemed somewhat high and that jumping from 300 feet might be preferable. “But at that height your parachutes won’t have time to open!” replied the company commander. “Oh.” said the Gurkhas “So we will have parachutes?” The Gurkhas went away, visibly relieved…
By the end of 1943 the Brigade, now under the command of Brigadier Hope-Thomson, had done nothing but train, train, train for nearly two years while no fewer than eight airborne operations had been cancelled. Operation ‘Zipper’ also looked no closer to becoming reality, thanks to a lack of landing craft. The brigade was consequently getting stale and was badly in need of fresh experience in the field. Hope-Thomson therefore asked permission to be deployed to the front line and the decision was taken in early January to place the brigade under the command of 23rd Indian Division, which as part of IV Corps was watching the hilly jungle frontier east of Imphal. The Brigade could therefore gain some valuable jungle experience, while releasing a ‘line’ brigade for a long-overdue rest. There might even be the chance of action against long-range Japanese patrols. However, the newly-formed 154 Para would remain in India to continue jump training.
In mid-March 1944, the Brigade arrived at Ukhrul, in the hills of the Indian-Burmese border north-west of Imphal, to relieve the weary 49th Indian Brigade. However, 49th Brigade was in something of a flap. A Japanese offensive had apparently erupted to the south-east of Imphal and Lieutenant General Scoones, commanding the Indian IV Corps was withdrawing the corps’ strength into the Imphal Plain, intending to fight the Japanese armies on ground of his choosing. The 23rd Indian Division suddenly found itself designated as Corps Reserve and was marching southwest to Imphal, leaving the newly-arrived Paras to take over a string of scattered hilltop positions from 49th Brigade’s rearguard, the 4/5th Mahratta Light Infantry and the Royal Nepalese ‘Kali-Bahadur’ Regiment.
 Lt Col Paul Hopkinson’s 152 (Indian) Para moved up to the Mahrattas’ HQ at ‘Kidney Camp’, high in the peaks southeast of Ukhrul. From ‘Kidney’ he sent two companies out to relieve Mahratta companies on their hilltop eyries; Major Webb’s ‘B’ Company was dispatched to Point 7386 (‘Badger’) and Point 7000 (‘Gammon’), while Major Fuller’s ‘C’ Company was sent to the otherwise un-named Point 7378. These positions dominated the only two east-west Jeep-tracks over the hills in the area, though were not mutually supporting and were beyond the range of the Mahrattas’ mortars at ‘Kidney’. The two companies were also disappointed to discover that the positions recently vacated by the Mahrattas were only half-prepared, so the Paras soon found themselves hard at work, improving their trenches, dugouts and firing positions.
Although the situation had changed from one of field training to alert watchfulness for invasion, the Indian Paras were confident. They were also reasonably sure that the nearest Japanese were at least forty miles away!
However, the Japanese were a lot closer than that! The Japanese 31st Division was now only twenty miles away and heading directly for Ukhrul, its mission being to cut the Imphal-Dimapur road at Kohima and to eliminate the British railhead and depot at Dimapur itself. Facing this unrealised threat, Hope-Thomson had so far been able to deploy only two companies of 152 Para! However, the remainder of the battalion would shortly be in position at ‘Kidney’ and at the moment, the Mahrattas, together with two companies of Kali-Bahadurs and a troop of Royal Artillery mortars, had still not departed for Imphal. However, the entire 153 (Gurkha) Para was still forty miles away at Kohima awaiting transport, while the brigade’s headquarters, MMG and engineer elements were similarly having difficulty in securing transport to move up to the brigade positions.
 Things south of the Imphal Plain meanwhile, were getting chaotic and control of the battle was slipping from Scoones’ grasp. The plan was for 50th Para Brigade to have slowly fallen back to the Imphal perimeter in the wake of 23rd Division. Instead, the brigade seems to have been forgotten by IV Corps and instead received the mistaken order to hold its ground on current positions. This was to be a fateful order.
Then on 19th March, Lt Col Hopkinson, while on a personal recce to ‘Badger’, spotted a glint of light in the distance. Looking through his binoculars, he was astonished to see a long column of men; a full battalion, complete with pack horses and even elephants, advancing up the Homalin Road! Point 7378 lay directly in their path and Hopkinson immediately radioed a warning to Major Fuller, whose ‘C’ Company was clearly gong to be fighting the brigade’s first battle…
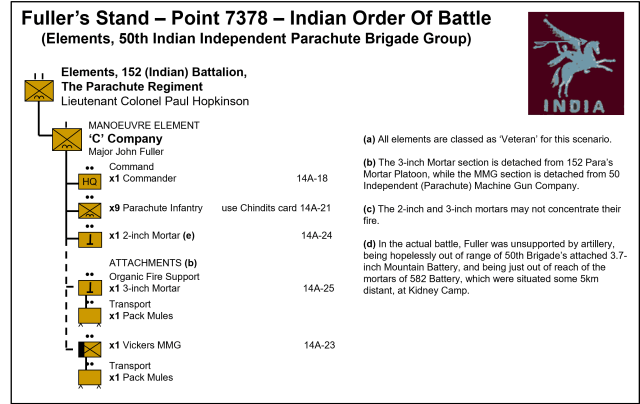
 Briefing for Major John Fuller, Officer Commanding ‘C’ Coy, 152 (Indian) Para Bn
Situation at 1100hrs, 19th March 1944 – Point 7378, East of Ukhrul, Assam
Your company took over this position yesterday from a company of the 4/5th Mahratta Light Infantry and has spent the last 24 hours improving the fighting positions and digging in deeper. You’re not expecting trouble, but there is a flap on at 23rd Division HQ, so it’s better to be safe than sorry.
Your position is atop a ‘pimple’ on a spur of Sihorifara Hill (Point 8425), whose peak lies 2-3 miles north of your position. Your position immediately overlooks the Pushing to Ukhrul Jeep track, which is one of the few east-west routes over the range of hills separating India from Burma. There is also a mule track cutting straight through your position, which takes the direct route to Ukhrul. Some two miles south of you, further along the same spur (codenamed ‘New Guinea’), is another company outpost at Point 7386, codenamed ‘Badger’, which dominates not only this Jeep track, but also another Jeep track crossing the hills from Humine.
The bulk of 152 Para is some three miles to the southwest, at Kidney Camp, along with 4/5th Mahrattas and a couple of companies of the Nepalese ‘Kali Bahadur’ Regiment. The rest of 23 Division, 50 Para Brigade HQ and the brigade’s support companies are strung out along the road from Imphal to Ukhrul, while 153 Para is still some 40 miles away to the northwest, at the Kohima depot.
Suddenly, your 2ic, Captain Roseby, reports that the Colonel has just sent an urgent signal – Japs have been spotted in at least battalion strength, only one mile to the east of your position!
Mission
You are to hold until relieved, with the intention of delaying the Japanese long enough to allow the Brigade to form defensive positions.

 Execution
Friendly Forces
• These are detailed in the attached order of battle (below). You have your own ‘C’ Company, with an attached section of 3-inch mortars from Battalion and a section of Vickers MMGs from the Brigade MG Company.
• Place 18 inches of entrenchments within your deployment area, delineated by the red circle.
• Deploy your forces as Hidden Unit markers within your deployment area.
• You may also deploy x5 Dummy Unit markers within your deployment area.
• You may split your command into two smaller Manoeuvre Elements if you so wish, in which case add a second, subordinate Commander unit (representing your 2ic, Captain Roseby).
• There is no hope of artillery support and while the RAF has gained air superiority over the Japanese Air Force within the last few weeks, there is little hope of getting any air support.
• Your 3-inch mortar section may pre-register three Defensive Fire targets. There is requirement to call for fire when an enemy unit enters (or has passed through) the beaten zone of this point.
• 2-inch mortars may automatically fire at any enemy unit that has been spotted or suspected by a friendly unit, without needing to call for fire.
• The MMG Section may either pre-register a point for Plunging Fire or may set up a pre-planned Grazing Fire beaten zone.
 Enemy Forces
• These are thought to consist of a battalion of infantry. Their lead company is now visible, marching along the Jeep track at Point ‘C’ on the map.
Recommended Optional Rules
In order to stand a fighting chance of winning, the Indian player really needs to make good use of his mortars and Vickers MMG section. To that effect, I recommend using the following optional rules to maximise Indian chances:
 • Machine Gun Grazing Fire (or ‘Firing on Fixed Lines’)
This method creates a ‘wall of fire’ through which an enemy must advance to reach your positions. This was always carefully pre-planned by a defender as part of a deliberate defence plan and required a tripod-mounted machine gun, well-supplied with ammunition. Note that I’ve amended this method from the original Battlefront: WWII optional rules.
- Only ground-mounted, tripod-equipped MMGs and HMGs may conduct Grazing Fire.
- The MG must be in a pillbox, dug-in, or in improved positions at the start of the game.
- Before the game starts, place the Grazing Fire Template onto the planned fire-lane and mark on a map (or take a digital photo) for later reference. The Grazing Fire Template is 10 inches long and is roughly conical in shape, being 1 infantry base wide at its base and 2 bases wide at the far end.
- The Grazing Fire Template may be placed anywhere in the normal arc of fire from the MG (i.e. anywhere in the front 180-degree arc).
- The Grazing Fire Template may be placed during the player’s Defensive or Offensive Fire phase and must be placed in its pre-planned position. This may not be changed or moved, though it may be removed at the start of the next friendly player’s turn.
- Any enemy units with aiming-points within the Grazing Fire Template are subjected to a Direct Fire attack using the normal Direct Fire factors, though with an additional -1 modifier.
- If enemy units attempt to take two actions within the Grazing Fire Template, any Suppression or Disorder result suffered during their first action will cancel their second action.
- If enemy units survive their first action unscathed and still have an aiming-point within the Grazing Fire Template, they will receive a second Grazing Fire attack during their second action.
- Grazing Fire is blocked by Dense Terrain and crestlines, though will attack units conformed to the edge of such terrain, as for normal Direct Fire.
- If the MG moves, falls back, panics or conducts ‘normal’ point-fire, the Grazing Fire Template is immediately removed and the unit may not conduct Grazing Fire again.
• Machine Gun Plunging Fire
This is a form of Indirect Fire conducted by MMGs, primarily as a means of interdicting and harassing enemy forming-up areas, lines of communication and reserves. British Commonwealth MG units equipped with Vickers MMGs were masters of this tactic.
If this option is used instead of Grazing Fire, pre-register the target using a small Indirect Fire Template and mark on a map or take a digital photo for future reference.
The method used is exactly as described in the Battlefront: WWII Support Page.
• Indian Fall-Back/Panic Options – A dug-in Indian unit that gets a Fall Back or Panic result on the Manoeuvre Table may instead opt to stay (Disordered) within the entrenchment. Otherwise, they will Fall Back/Panic toward the western table edge.
 Briefing for Major Shimano, Commanding III Battalion, 58th Infantry Regiment
Situation at 1100hrs, 19th March 1944 – Point 7378, East of Ukhrul, Assam
Your battalion forms the extreme left flank of 31st Division’s advance. On your right, the regiment’s II Battalion is making for the peak of Point 8425, while I Battalion is swinging around the north side of that mountain to take Ukhrul from the rear. On your left is the 60th Infantry Regiment, which forms the extreme right flank of 15th Division. Together, your primary objective is to continue driving westward, with the intention of cutting the Imphal to Kohima road. Once that is achieved, Imphal will be cut off from reinforcements coming from Kohima and the British rail-head at Dimapur. The 60th Regiment will turn south, to keep northern escape routes from Imphal firmly shut, while the 31st Division strikes north to capture British supplies from their depot at Kohima and then continue the drive on to Dimapur.
You have been advancing along the Homalin to Ukhrul road for several days now and thus far there has been no sign of the enemy. You have an excellent guide in Captain Nishida Susumu of 9th Company – he led a long-range reconnaissance patrol as far as Kohima last year and consequently knows the route well, along with the likely points of British resistance. One of these is the village of Ukhrul and the first combat task for Colonel Fukunaga’s 58th Infantry Regiment will be to quickly destroy the British garrison there, so that the division may push on to Kohima as quickly as possible.
Your battalion is now just passing over the crest of this range of hills separating Burma from India and in the far distance, you can see the wide Imphal Plain. However, you don’t have time to take in the view. Your plan here is for part of your battalion to take the winding main track, through the village of Sangshak, cutting the Ukhrul to Imphal road while the rest of your battalion takes the more direct to Ukhrul, via the mule track over the peak in front of you – marked as ‘7378’ on your captured British map.
However, your scouts have just sent a runner back to you. They have spotted figures on the crest of the hill and signs of military activity. It looks like you will need to fight for this mountain pass after all!
Mission
You are to overcome all enemy resistance at Point 7378, with the intention of pressing on to Ukhrul as soon as possible.

Execution
Friendly Forces
• These are detailed in the attached order of battle (below). Your 9th Company is leading the column along the track and has just passed over the crest the pass. The rest of the battalion is strung out on the march and will take some time to assemble.
• 9th Company begins the game deployed in close column, on the Jeep Track, within the red circle shown on the map (the rearmost base is touching the table-edge and all other bases are arranged base-to-base in front of it, in a single column with the Company Commander’s base leading).
 Enemy Forces
• Intelligence is minimal. All your scouts can say is that they have seen activity on top of Point 7378, which dominates all routes through the pass. Colonel Fukunaga advises you that he cannot spare II Battalion to attack them from the north, so you are to deal with them yourself!
Reinforcements
• 10th Company will arrive in close column at Point ‘X’ on Turn 3.
• 11th Company will arrive in close column at Point ‘X’ on Turn 6.
• The Battalion Headquarters, with the Battalion Gun Section and MG Company, will arrive in close column at Point ‘X’ on Turn 8.
• All reinforcements will arrive in close column at Point ‘X’. They do not need to make a Manoeuvre Roll on the turn in which they arrive. However, they may only move for one action during the turn in which they arrive.
• 12th Company is escorting the Regimental Gun Company and supply echelon, so is consequently delayed while trying to coax the fractious pack mules and elephants over the precipitous mountain pass. These elements will not therefore appear until tomorrow and their current location on the edge of a steep mountain pass does not permit them to engage in indirect fire against the enemy.
 Game Sequence
• The Indian player has the first turn.
• The scenario ends at the end of the Japanese Turn 20.
Victory & Defeat
The scenario victory conditions are listed below.
Note that ‘victory’ for the Indians is subjective, as the Japanese still have more troops left to throw into the fight on Day 2 and will undoubtedly overwhelm the defenders. However, the defenders’ sacrifice will have delayed the Japanese long enough for a coordinated defence to be formed by 50th Parachute Brigade at Sangshak.
Total Japanese Victory: There are absolutely no un-disordered Indian troops anywhere on the table at the end of Japanese Turn 20.
Tactical Japanese Victory: There are un-disordered Indian troops still on the table, though there are none within the entrenched area on Point 7378 at the end of Turn 20.
Indian Victory: There are still un-disordered Indian troops remaining within the entrenched area on top of Point 7378 at the end of Turn 20.
 Terrain Effects
Open Terrain – As per the rulebook, but note that everything south of the main crest-line (and south of the second contour line down from the peak), is classed as Steep Slopes (see below).
Dense Jungle – Dense Area Concealment. Soft Cover. Half Speed for Troops. Impassable to Guns, though they may be deployed in such terrain if they have been transported there by pack mules.
Brush – Sparse Area Concealment. Soft Cover. Half Speed for Troops. Half Speed for Guns.
Steep Slopes – Half Speed for Troops. Half Speed with Bog-Down check for Guns. No Rapid Advance. Note that this penalty is cumulative and must be applied in addition to penalties for vegetation. So an infantry unit passing through jungle on a steep slope would only move a quarter of the full rate (1 inch) per action.
Deep Gully – Sparse Edge Concealment for units within the Gully. Hard Cover. Troops require a Breach action to enter and exit the gully. Guns also require a Bog-Down check. Troops may move along gullies at half speed, but Guns may not move along gullies.
Jeep Track – Unpaved Road. Classed as Open Terrain. All units on the Jeep Track are automatically spotted by any units on a higher elevation with an uninterrupted line of sight. Note that the Jeep Track has High Banks on either side (as the track is cut out of the hillside), which confer no cover bonus, but require a Breach action to cross (Guns also require a Bog-Down check).
Mule Track – Counts as Open Terrain, rather than road. The Mule Tracks take the best route up the hill, thus negating the half speed penalty.
Crest Line – Blocks line of sight, unless the observer is on a higher contour. The nature of the terrain in this part of the world results in many knife-edge ridges.
 I realise that the terrain for this scenario is rather complicated, being drawn from aerial recce photos and original maps. Indeed, this is a recurring problem when attempting to recreate battles on the Burma Frontier and it is often difficult to draw a balance between accuracy and simplicity. Hex-based terrain tiles can translate accurate maps onto the table with relative ease, but you do tend to need a lot of hex tiles and they’re not cheap! For that reason, I’ve included a simplified version of the map, which should be within the means of most wargamers’ terrain collections.
The after-action report will follow soon!

Great stuff. I’ve been toying with scenario based on these events myself. Glad to see you actually pulled something together.
Thanks Steven. Yes, first I stuck the scenario together in 2009, but it’s taken me a while to get around to playing it! 🙂
I’ve also got the bare bones of a full Battle of Sangshak scenario, but that’s a MUCH bigger game!
Mark
Pingback: ‘Fuller’s Stand’: ‘C’ Company, 152 (Indian) Para at Point 7378, 19th March 1944 (The Game) | Jemima Fawr's Miniature Wargames Blog