

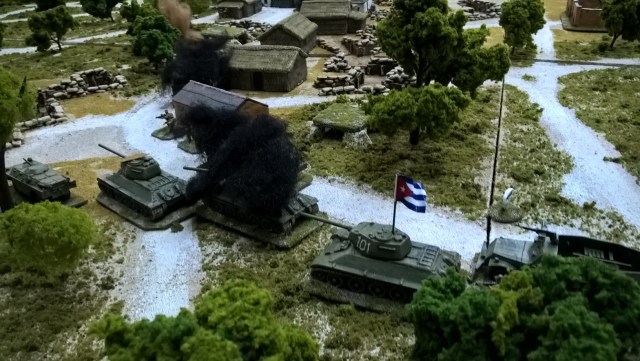
 As discussed in the previous articles here, here and here, I decided last year to do a demo game based on the controversial 1978 Cassinga Raid, which was an early engagement in South Africa’s ‘Border War’ in Angola. I took it to Warfare 2019 in Reading last November, where it won the trophy for Best Demo Game and I’ll be taking it to two more shows in 2020 – Partizan 2020 in Newark in May and Crusade 2020 in Penarth, which takes place in two weeks, on Saturday 25th January.
I don’t yet have any players for either show, so let me know if you want to come and play! 🙂
The game is designed for Battlefront: First Echelon, which is my own long-in-development Cold War variant of Battlefront: WWII by Fire & Fury Games. However, this scenario (and indeed much of the Border War) is so low-tech that the Battlefront: WWII rules can be used as they are, using the appropriate unit cards and scenario rules (see below).
So as I haven’t posted it yet, here’s the full scenario:
The Cassinga Raid, 4th May 1978
Historical Overview
The Angolan Civil War began in 1975 following the sudden end of Portuguese colonial rule in the country and the subsequent scramble for power by various rival independence movements. The Soviet Union and Cuba were very quick to throw their political and military backing behind the People’s Movement for the Liberation of Angola (MPLA) faction, who quickly defeated their US and South African-backed FNLA and UNITA rivals to become the de facto Angolan Government.
The MPLA soon began providing other African liberation movements with bases, protection and logistical support; most notably for the South-West African People’s Organisation (SWAPO) and its military arm, the People’s Liberation Army of Namibia (PLAN). SWAPO-PLAN rapidly began training guerrillas and launching raids across the border into South-West Africa (modern-day Namibia), which had been ruled by South Africa since the end of WW1.
By 1978 the South African Government decided that it could not tolerate any further attacks and ordered the South African Defence Force (SADF) to mount a limited strike into Angola, with the intention of destroying SWAPO-PLAN’s bases and thus preventing further raids.
Two mechanised spearheads of the SADF’s Operation REINDEER would strike at SWAPO-PLAN forward bases near the border, but the third spearhead would be a parachute assault on Objective ALPHA, which was SWAPO-PLAN’s main headquarters and training base at ‘Camp Moscow’ (the former mining settlement of Cassinga). This assault succeeded by the skin of its teeth, with the paras completing their objective and extracting by helicopter just as a Cuban armoured relief column arrived to oppose them.
From a military standpoint, the Cassinga Raid proved to be highly effective (despite some extremely shoddy planning and potentially disastrous decisions) and SWAPO-PLAN operations reduced markedly during the following year. However, it was politically disastrous for South Africa, being reported internationally as a deliberate attack on a refugee camp and as a ‘massacre of the innocents’.
Regardless of the controversies, the raid makes a very interesting tactical situation and we have based our scenario primarily on the dissertation by General Edward McGill Alexander, which seems to be the most balanced and comprehensive account of the battle produced to date.
 Briefing for Colonel Jan Breytenbach, Commanding Officer, SADF Composite Parachute Battalion
Situation
The increased level of SWAPO-PLAN terrorist raids from Angola into South West Africa has become intolerable to the government and a limited offensive, code-named Operation REINDEER has been put in motion to seek out and destroy SWAPO-PLAN within their Angolan safe-havens. Two of the three battlegroups taking part in the operation will be ground-based, but the newly-created 44 Parachute Brigade has been tasked with forming the third element of the operation; taking the fight to the enemy deep within Angola.
You have assembled a Composite Parachute Battalion from the Citizen’s Force reservist 2 & 3 Para Battalions, leavened with a sprinkling of regulars from 1 Para Battalion. This will be inserted by parachute onto the SWAPO-PLAN base, designated Objective ALPHA (the former iron ore mine of Cassinga) and will then be extracted by helicopter. The SAAF promises that there will be ample close air support for the assault. The construction of a nearby SA-3 SAM site means that this type of operation will probably not be possible in the future, so you need to get the job done.
Mission
Your Composite Parachute Battalion is to assault the SWAPO-PLAN base at Cassinga, with the intention of inflicting maximum personnel and material losses on the enemy.
Execution – General Outline
The battalion will comprise a tactical headquarters, four understrength rifle companies, two independent rifle platoons, a mortar platoon and an anti-tank platoon, plus an airborne reserve consisting of a reinforced rifle company (see Order of Battle below).
Following electronic jamming and a preparatory air bombardment by the SAAF, the battalion will jump from C-130 Hercules and C-160 Transall aircraft onto their designated DZs surrounding Objective ALPHA (see DZ Map below) and will assault the objective to achieve the Mission. The Battalion will then extract by helicopter in two or three lifts as necessary, from the designated Helicopter Landing Zones (see LZ Map below).
Aside from those Cuban and other foreign advisors involved in training SWAPO, you are wherever possible, to avoid direct confrontation with FAPLA (Angolan Armed Forces), Cuban or other non-SWAPO military units. There is a Cuban armoured battlegroup at Tetchamutete (only 15km to the south), consisting of a company of T-34 tanks and several companies of armoured infantry, but we are hoping that the SAAF jamming effort will restrict their ability to respond effectively to our operation.

Execution – Detailed Tasks
The sub-unit taskings are:
• A & B Companies, with the Battalion Headquarters and Mortar Platoon, will drop to the west and will directly assault the objective.
• C Company will drop to the east of the objective and will establish a stop-line to prevent enemy forces from escaping in that direction.
• D Company (-), with the Anti-Tank Platoon, will drop to the south of the objective and take the SWAPO Engineer Compound at the southern end of the town before establishing a stop-line to prevent escape, as well as to prevent any intervention from the Cuban garrison at Tetchamutete.
• E Company is the airborne reserve and will remain on board its C-160 Transall aircraft until called in to reinforce the operation.
• 11 Independent Platoon will land to the north of the objective and will assault the tented training camp before rendezvousing with the battalion.
• 9 Independent Platoon will land to the north of the objective and will assault a complex of brick buildings, thought to be the Cuban advisors’ accommodation, before establishing a stop-line to prevent escape along the road to the north.
• Further paratroops and a medical team are being deployed to defend the Helicopter Admin Area, which has been established deep in the Bush and well away from any enemy forces.
• We estimate that it will take two hours (8 turns) to subdue the SWAPO-PLAN garrison, retrieve documents and prisoners and destroy defensive weapons and structures. The first helicopter lift is therefore planned for 1000hrs (Turn 8).
 Preparatory South African Air Attacks
During the Close Air support Phase of the South African Turn 1, the South African player will conduct a series of pre-planned air attacks on Cassinga. These will happen automatically and there is no Call For Fire roll to bring these in. There will also be no SWAPO AA fire:
1. A formation of Canberra bombers will conduct an ‘Alpha-Bomb’ attack on the centre of Cassinga, timed to catch the bulk of the SWAPO personnel at the daily morning parade on the parade-ground. These were hundreds of spherical, basket-ball sized fragmentation bombs, which would arm on impact, then bounce back up and explode at approximately 10 feet from the ground. Historically this attack probably caused the majority of casualties on the day. The beaten zone for the Alpha-Bombs is 4x Large IDF Templates wide by 4x Large IDF Templates deep (500x800m), centred on the road-junction in the centre of the town and aligned along the north-south main road. This should completely encompass the parade-ground and a lot more besides. All SWAPO units within this beaten zone will be attacked with an air-to-ground modifier of +3. Units within Built-Up-Sectors, Bunkers and Trenches will gain an additional -1 cover modifier on top of their normal cover modifier, as these are light fragmentation weapons with little penetrative effect.
2. Two Buccaneer ground-attack aircraft will attack the tented training camp and one of the identified AA sites (player’s choice) with bombs. These aircraft may return in Turn 2 to make a second attack on these targets (which does not require an Air Support roll), or any target identified by the Forward Air Controllers (this DOES require a Call For Fire roll). The Buccaneer attacks may not overlap the Canberra attack. The Buccaneers will return to base at the end of Turn 2.
3. Once the Canberras and Buccaneers have made their initial strikes, a single Mirage III may perform a single strafing run on any target (for this attack they do not need to be spotted and an Air Support roll is not required). Note that the Mirage attack may in this instance overlap the Canberra or Buccaneer attacks and may therefore exploit any previous Disorder caused by the previous attacks. The Mirage will then return to base.
Parachute Drop Procedure
Each South African Manoeuvre Element (ME – a Company, Independent Platoon or Battlegroup HQ) is allocated to a pre-determined Drop Zone (DZ), in accordance with the mission plan. These DZs may not be changed.
Every ‘unit’ (i.e. individual troop-stand) in each South African ME is represented by a Drop Marker made of thin card or heavy paper (normal printer-paper is a bit too light for the job!) and matching the base-size of each unit. The Drop Marker must display exactly what the unit type is and which ME it belongs to, exactly matching the order of battle.
Each ME’s Drop Markers are then arranged in a single row, along a 12-inch ruler, representing the ‘stick’ of paratroops. The order of troops within the stick is entirely up to the South African player.
Once the initial air attacks on Cassinga have been completed (see above), hold another 12-inch ruler or dowel (or one of my flight-stands) vertically in the centre of a DZ and place the ruler holding the appropriate ME ‘stick’ across the top of it, to make a ‘T’. Each ‘stick’ of Paras must be aligned north-south.
As an extra challenge, the umpire may decide to double the drop-height, due to the historically scattered drops by all except C Company and 9 Independent Platoon.
Then flip the ruler over to drop the paras onto the DZ.
Once all Drop Markers have been dropped, roll on the Bail-Out Table for each marker, using the following modifiers:
+0 Landed within 1 inch of an undisordered enemy Troop or Gun unit.
+1 Landed in a River, Pond or off the table.†‡
+2 Landed on Woodland, Swamp, Built-Up Sector*, Wall*, Hedge*, Trenches*, Bunker* or if the marker is hung up on a tree model in Bush terrain.
+3 Landed in Bush, Clear terrain or on a Road or Path.
* If a Drop Marker lands on or touching a BUS, Trench or Bunker, it is placed immediately adjacent to that feature and outside it (i.e. it will not drop immediately into field defences!). If a Drop Marker lands on a wall or hedge it must be placed immediately adjacent to that feature, on whichever side the majority of the marker landed.
† For a bit of devilish amusement, my terrain includes a crocodile lurking in one of the water-features… Any unit landing on the crocodile is instantly KOd and any unit landing within 1 inch of it suffers the +0 landing modifier.
‡ If a unit lands off-table, place the marker on the edge of the table at the closest point to their planned DZ.
Drop Markers that survive the landing are immediately replaced by models (plus Suppression or Disorder Markers where appropriate), which must be placed within the ‘footprint’ of the marker, though may face any direction.
The above procedure takes place at the end of the Air Support Phase and before the Offensive Fire Phase. South African units may then conduct Offensive Fire, Manoeuvres and Close Assaults as normal.
 Airborne Reserve Company
To call in the reserve E Company, one of the South African ground-based FACs must make a successful call for Close air Support on the turn before E Company is due to drop. The DZ for the drop must be designated at the time the successful call is made and must be any one of the designated DZs. Once designated this may not be changed, though it may be cancelled on a second successful Call for Fire roll during the turn in which it is due to arrive (in which case the company goes back into reserve and may be called again).
If the reserve E Company is called in, their C-160 may be subjected to AA fire. If the aircraft is Suppressed, Disordered or Knocked Out, roll on the Bail Out Table for each unit first before rolling again for landing using the above procedure.
Be aware that if E Company is called in, this will require a third helicopter lift to extract.
Calls for Fire
The South Africans may use the WW2 British Call-For-Fire Table.
Only the South African Mortar Platoon may fire as a battery and concentrate fire. Note that in order to fire as a battery, each of the platoon’s mortars must be emplaced within 2 inches of the next mortar in the platoon, as per the standard rules.
Any SWAPO, FAPLA or Cuban weapons with an IDF capability (such as 60mm mortars and B10 82mm recoilless rifles) may only fire IDF at self-observed targets.
All mortars may fire HE Shelling, Random Shelling or Smoke missions. B10 Recoilless rifles may not fire Smoke. Only the South African Mortar Platoon may concentrate fire, as mentioned above.
Close Air Support
Turn 2: A Cessna 185A Air Observation Post will arrive to coordinate Close Air Support. It will remain in situ over the table until withdrawn or destroyed.
Turn 3: A single Buccaneer armed with rockets will become available to perform Close Air Support missions. It may perform two rocket or tank-busting attacks (in subsequent turns) before returning to base.
Once the Buccaneer has returned to base, a Mirage III will become available to perform a single strafing or tank-busting attack.
Turn 6: A single Buccaneer will return to provide Close Air Support, again armed with rockets. It may conduct two Rocket or Tank-Busting attacks (in subsequent turns). It may then conduct a single ‘Show of Force’ as a third attack, which is conducted in the same manner as a Strafing attack (-1 versus Vehicles and 0 versus Troops, Guns & Soft Vehicles), but any KO results are commuted to Disorder.
Once the Buccaneer has returned to base, a Mirage III will again become available to perform a single attack.
Another rocket-armed Buccaneer CAS mission will become available 3 turns after the Buccaneer returns to base.
This sequence of Buccaneer and Mirage support is repeated until the end of the scenario or until the SAAF lose two Buccaneers, at which point all further Buccaneer CAS missions will be halted and the Mirage IIIs will halt their strafing runs (the Mirages were meant to be providing air defence in any case, not conducting strafing runs!).
If there is no FAC available to direct an air strike, fighter-bombers may self-observe vehicles or AA guns by rolling on the Close Air Support table with an additional -3.
Recovery of Intelligence
It is thought from aerial reconnaissance that the brick building east of the parade square is the camp headquarters building and is therefore most likely to contain intelligence material. It takes a unit one whole turn occupying a Built-Up Sector to effectively search it. Any intelligence material contained therein will be revealed by the umpire.
When an enemy unit is knocked out in close combat, roll a D10. On a roll of 8, 9 or 10 that unit will be captured and may be extracted for interrogation. Add +1 to the roll if a Command unit is involved in the combat. Treat PoWs in the same manner as casualty markers (see below).
Demolishing Structures
Structures (i.e. brick BUSs and bunkers) will be destroyed if they are subjected to an unmodified roll of 10 during an air-strike. Otherwise they may be demolished by troops occupying them and performing ‘Improve Position’ actions, as per the standard Battlefront: WWII rules.
Intelligence may not be recovered from demolished structures.
South African Casualties
When a South African ground unit is KOd, replace it with a casualty marker.
Casualty markers may be moved if there is a friendly unit in base-to-base contact, but may only do so at half speed.
Units with casualty markers attached may not initiate close combat, but may perform any other action.
Casualty markers may ‘self-load’ onto landed helicopters within 1 inch.
Casualty markers left behind after extraction will be worth a lot more Victory Points to SWAPO (see below).
Helicopter Extraction
The helicopter extraction force is waiting, deep in the bush, at the Helicopter Admin Area (HAA), for the order to tale off, fly in to Cassinga and extract the paratroops (in at least two lifts). This will normally consist of six Puma transport helicopters, but there is one additional Puma helicopter held in reserve at the Helicopter Admin Area. This reserve helicopter may be brought in to replace losses for 2nd and subsequent lifts and may be added in any circumstances to the final lift.
The South African player must make a successful Air Support roll on the turn BEFORE the helicopters are due to arrive, designating each helicopter to one of the pre-planned LZs. Only one Air support roll is needed, regardless of the number of helicopters and LZs being used. The South African player must make a note of how many helicopters are allocated to each LZ.
The SADF plan estimates that the first lift from Cassinga will take place at 1000hrs, so the South African player may not call for helicopter extraction before the Air Support phase of Turn 6.
Once successfully called in, the helicopters will arrive during the Air Support phase of the FOLLOWING turn. They will arrive on the table-edge as a single formation from any direction, before splitting and moving to their allocated LZs.
The Pumas will fly at Nap-of-Earth and are therefore treated for line-of-sight and spotting purposes, as a large, moving vehicle.
The Pumas have an Armour rating of 0 and may carry 4T. They are only armed (with a door gun) when troops are loaded (i.e. the loaded infantry use their own machine guns to defend the aircraft when on the ground – e.g. if troops have boarded the helicopter but enemy troops appear before take-off).
Each landed helicopter fills the ‘footprint’ of a Small IDF template. These may not overlap and may not protrude outside of a designated LZ.
If the enemy has occupied a designated LZ, any helicopters allocated to that LZ will still have to fly to that LZ (and be subjected to AA fire), but may then immediately divert to an alternate LZ.
The helicopters will stay on the ground for as long as the South African player desires and will depart again during the South African Air Support phase.
It takes 1 action for a unit to board a helicopter during the Manoeuvre Phase.
Provided they are within 1 inch of a helicopter, units may board using a Panic, Retreat or Rally action.
Commanders, FACs, 60mm mortars and Anti-Tank Teams may count as ½ units toward the helicopter’s maximum loading capacity, due to their low manpower. It will therefore be necessary to keep track of casualty markers resulting from these units (perhaps different sizes of base for the casualty figure, or a different number of casualty figures on the base).
While on the ground, helicopters may be spotted and targeted as large soft vehicles.
The helicopter formation will not return until the 4th turn after the last helicopter has departed the table.
If a helicopter is destroyed with troops on board, the troops will attempt to bail out at that point as if from a destroyed vehicle, though with an additional -3 modifier. An extra Troop unit is created for the aircrew; if they survive the crash they will use the same stats as a FO unit.
For the purposes of this scenario, any Suppression or Disorder markers collected by the helicopters are automatically removed at the start of the South African Air Support phase. Their only effect is on the ability of any loaded troops to fire or the ability of the crew to defend the helicopter during close assault on the ground.
If a grounded helicopter is engaged in close combat while on the ground it will defend itself with a close combat rating of +0/+0 and may never be outflanked. Any losing result will destroy the helicopter; boarded troops may then attempt to bail out in the normal manner and will immediately conduct a Fall Back action Disordered, regardless of the result of their Bail Out roll. Any casualty markers will be automatically knocked out and handed to the SWAPO/Cuban player for later VP calculation.
If a loaded helicopter is shot down while attempting to depart the table, the passengers may attempt to bail out as if from a vehicle, though with an additional -3 modifier. Any casualty markers are automatically knocked out and handed to the SWAPO/Cuban player for later VP calculation.
If a loaded helicopter departs the table with a Suppression or Disorder marker, any loaded troops or casualty markers must roll on the bail-out table as they leave the table and any units knocked out as a result must be added to the casualty total.
 Victory Points
Each Knocked Out SWAPO Troop unit +1 VP
Each Knocked Out SWAPO Commander or Hvy Wpn +2 VPs
Each Captured SWAPO troop unit or Heavy Weapon +2 VPs
Each Captured SWAPO Commander +5 VPs
Knocked Out Dimo Hamaambo +10 VPs
Captured Dimo Hamaambo +50 VPs
Each Searched BUS +2 VPs
Each Demolished BUS or Bunker +2 VPs
Discovered Document Cache +50 VPs
Each Knocked Out Cuban/FAPLA Armoured Vehicle +1 VP
Each Cuban/FAPLA ME reduced by 25% +1 VP
Each Cuban/FAPLA ME reduced by 50% +2 VPs
Each Cuban/FAPLA ME reduced by 75% +3 VPs
Each Captured Cuban/FAPLA unit Same as Knocked Out (no added value)
 Briefing for SWAPO-PLAN Army Commander Dimo Hamaambo at Camp MOSCOW
Situation
Things have been busy at Camp MOSCOW (Cassinga) recently. The latest batch of recruits are just completing their training and you now have four fully-trained Detachments ready to send sown south to Camp VIETNAM, ready for the annual infiltration campaign into Namibia. This year’s infiltration will undoubtedly be a lot harder than last year, as the Boers have been heavily reinforcing the border area, while their special forces have been ambushing your cadres even on the Angolan side of the border.
Things are much safer here, however. The border is 260km away and the only risk is from air attack; the threat even of that will be removed once your Russian friends finish building the nearby SAM site. Nevertheless, your camp is well-prepared for all eventualities and has extensive entrenched defences and heavy weapons, as well as a nearby Cuban garrison at Tetchamutete, only 10 miles away.
It is now 0800hrs and you are having your breakfast in your house while the revolutionary cadres assemble on the parade square outside to salute the flags of Free Namibia and Angola and to receive their daily orders and work-tasks. Your signals officer is grumbling that all the frequencies seem to be jammed and he can’t raise anyone on the radio, not even the Cubans at Tetchamutete. You are about to reply, but what’s that sound…? Jets? You look out of the window and four twin-engined jet-bombers are flying in line-abreast down the line of the main road. From the engine configuration they’re Illyushin 28s and are probably Cubans giving your cadres a fraternal revolutionary fly-past. Cadres and even the anti-aircraft gunners are waving to the fly-boys…
But why are the bomb-doors open…?
As you watch, each bomber disgorges dozens of what appear to be tiny black footballs and you realise with horror that they are enemy bombers!
The world erupts around you…
Mission
Survive! And try to save as many of your cadres as you can while you’re at it!
Execution
Your order of battle can be found below, though half of it is probably already dead. You have/had a Headquarters and Defence Group, four ‘Front Detachments’, which are rifle company-sized units, a Training Company, a Reconnaissance Company and an Engineer Company. Note that the Front Detachment and Training Company have only mixed and obsolete weapons, so use the Guerrillas unit card (FA-40). The Reconnaissance Company uses the Infantry card (FA-37) and the Engineers use the Combat Engineer card (FA-38).
The bulk of the Front Detachments are currently on parade on the parade square; this includes the commander of each Detachment and two-thirds of the rifle sections in each Detachment. These are formed up in close order. The rest of each Detachment, including the Detachment mortar section, is deployed on guard duty within the Detachment’s designated defence zone (see the deployment map at Annex B).
The Training Company is conducting its own small parade within its tented camp area (formed up in close order).
The Reconnaissance Company and Engineer Company are senior enough to be excused morning parade and are therefore deployed within the built-up-sectors in their respective deployment area. One section in each company may alternatively be deployed within in an entrenchment within their deployment area.
Commander Dimo himself is deployed within his house, which is a concrete building on the north side of the parade square. The two heavy anti-aircraft are dug into weapons pits at the western end of the north-west trench-line. The rest of the Headquarters Group’s heavy weapons are spread evenly around the perimeter; allocate one heavy weapon (either an 82mm B-10 recoilless rifle or a DShK 12.7mm HMG) to each of the four Front Detachment defence areas and deploy within an entrenchment.
Most of the SWAPO trucks are parked in the Motor Transport Section, which is co-located with 1st Front Detachment. However, one truck is parked at the Engineer HQ and Dimo’s personal car is parked immediately outside his house. SWAPO vehicles may only be moved if units have boarded them and they do not count toward ME strengths, losses or VPs. Their Troop Quality rating will be the same as the best-quality unit that has boarded the vehicle. Cuban/FAPLA vehicles however, are classed as units in their own right and count toward ME strength, losses and VPs.

 SWAPO Anti-Aircraft Fire
The shock of the attack means that SWAPO units may not perform AA Fire during Turn 1. They may however conduct Defensive Fire as normal.
Friendly Reinforcements
The Cuban/FAPLA garrison, situated some 15km away at Tetchamutete is your only hope, though communications to them are presently jammed. See the order of battle below.
For game purposes the relief column will automatically arrive on the Tetchamutete road at the start of SWAPO Turn 16, However, if a SWAPO unit manages to escape by vehicle on the Tetchamutete road the column will arrive three turns after that vehicle leaves the table.
Of course an umpire can always bring the column on early to keep things interesting…
 Victory Points
Each Knocked Out SADF Troop unit +5 VP
Each Knocked Out SADF Commander +10 VPs
Each Captured SADF Troop unit +25 VPs
Each Captured SADF Company Commander +40 VPs
Knocked Out SADF Battalion Commander +75 VPs
Captured SADF Battalion Commander +100 VPs
Each Destroyed SAAF aircraft + 25 VPs

Terrain
 Movement Through Trenches
Troop movement along trenches is conducted at half-speed.
Troops do not need to perform a Breach action to enter trenches, though they must perform a Breach to leave trenches, unless it is via a ramp exit or similar.
Units in trenches may not be enfiladed by fire (in reality the zig-zags of field trenches were far more dense than shown on the table and effectively prevented enfilade fire).
Units in trenches may not be outflanked by units moving along the same trenches.
‘Bush’ Terrain Type
The Angolan Bush or ‘Bundu’ is a curious terrain-type: Although a lot more open than what would normally be considered as ‘woodland’, the trees, shrubs and long grass severely restrict lines of sight – not as badly as dense woodland, but more so than what would be considered to be ‘sparse’ terrain in Battlefront: WWII.
A unit may therefore observe through a maximum of 10 inches of Bush terrain. This is cumulative, so a unit can observe through 4 inches of bush, then a clear/sparse area and then another 6 inches of Bush.
A unit observed through Bush terrain is classed as being in Sparse concealment and Soft cover.
The edge of Bush terrain does not block line of sight.
The trees and shrubs of the Bush, as well as numerous termite-hills and small water-holes or dried-out hollows can be punishing on vehicles, so all Vehicle movement through Bush is performed at half-speed. Troops may move at full speed.
Bunkers
Anti-Aircraft Guns, Recoilless rifles and Mortars may not be placed within bunkers.
HMGs such as the DShK may occupy bunkers, but they may not perform AA fire while doing so.
Troops within bunkers may not perform AA fire or use RPGs.
Built-Up Sectors
These are a mixture of soft and hard cover. The hard cover BUSs represent some concrete and mud-brick buildings and compounds, some of which were clustered in the town centre (HQ, stores, hospital, etc), while others were at the northern and southern extremities of the town.
Tented Training Camp
Treat this the same as the Bush: Sparse Concealment, Soft Cover and half-speed for vehicles.
Sequence of Play
The South African player will perform the first turn of the game.
The game will last a maximum of 24 turns or until the SADF loses four helicopters. Any SADF units left on the table after that point will be classed as captured.
Recovery of Intelligence
Before the game starts, the umpire will place one Intelligence Materials chit beneath one BUS in Cassinga. This will NOT be the building that the SADF assume to be the HQ building – this is in fact simply a store-building. The documents are instead to be found in Dimo Hamaambo’s house, which is to the north of the parade square. If the SADF player has read this scenario, place the chit under a random BUS.
As mentioned in the SADF briefing, PoWs may be captured on a roll of 8, 9 or 10 whenever a SWAPO unit is defeated in close combat. Add +1 to the roll if a Command unit is involved in the combat. They are treated in all respects the same as casualty markers.
Modified Victory Conditions (UMPIRE’S EYES ONLY!)
Note that after the first SADF helicopter lift, General Constand Viljoen, the General Officer Commanding the Army, will arrive and will join Breytenbach’s headquarters! The SWAPO player will then gain double the VPs for knocking out or capturing Breytenbach’s HQ.
Unit Cards
Being a card-carrying technophobe, I haven’t yet worked out how to import pdf documents into this webpage, so go to the Battlefront Card Creator Page and select a list of cards for each side (keep the Ctrl key pressed as you click on each unit card in order to create a list) and it’ll then create a pdf document, with nine cards (3×3) per page that you can then print off. You’ll need the following unit cards:
SADF-27 – Parachute Infantry
SADF-31 – Assault Pioneers
SADF-34 – Commander
SADF-35 – FO/FAC
SADF-37 – M1 60mm Mortar
SADF-46 – Puma
SADF-51 – Para Antitank Team
SADF-52 – Mirage III CZ
SADF-59 – Cessna 185A
SADF-60 – C-160 Transall
SADF-61 – Buccaneer S Mk 60 (Cassinga)
FA-02 – T-34/85
FA-06 – BRDM-2
FA-09 – BTR-152
FA-21 – UAZ-469
FA-23 – Ural-375
FA-26 – B-10 82mm Recoilless Rifle
FA-28 – DShK 12.7mm AAMG
FA-30 – ZPU-2 Twin 14.5mm AAMG
FA-31 – ZPU-4 Quad 14.5mm AAMG
FA-33 – ZU-23-2 Twin 23mm AAA
FA-36 – Commander
FA-37 – Infantry
FA-38 – Combat Engineers
FA-40 – Guerrillas
FA-43 – Brandt 60mm Mortar
FA-63 – GAZ-66
That’s all of it for now. I hope to catch up with some of you at Crusade! 🙂
I’ve edited this to add a chunk of text that I missed earlier – namely the information on terrain, etc that comes after the SWAPO briefing.
Pingback: Jemima Fawr’s Review of 2020 | Jemima Fawr's Miniature Wargames Blog