
 Last weekend we had another all-day gaming session at the Carmarthen Old Guard and Alan, Andy and I once again decided to do an American Civil War historical refight in 10mm with the superb Fire & Fury 2nd Edition rules. I’m still building up my armies, so the choice of historical scenarios is limited by what I can field, but the Battle of Cedar Mountain from the Fire & Fury 1st Edition ‘Great Eastern Battles’ scenario book fitted the bill.
[Edited 18 Nov 22: Fire & Fury games have now written a new Brigade Fire & Fury 2nd Edition version of the scenario, which is now available to download from the BFF Scenarios Page. Their research is far better than mine, so I’d strongly recommend using their unit ratings and labels instead of mine! 🙂 ]
 On paper the Union Army at Cedar Mountain doesn’t look like it has the slightest chance of winning, as it’s outnumbered 2:1 and is attacking! However, a lot of the Confederate Army starts the scenario detached or on the march and are exhausted following a long march in searing heat. The Union Army meanwhile starts with a massive artillery superiority and the element of surprise…
The Battle of Cedar Mountain was the first major battle of the Northern Virginia Campaign (a.k.a. the Second Manassas or Second Bull Run Campaign) of 1862: With George McClellan’s Union Army of the Potomac bottled up in the Virginia Peninsula following his disastrous Peninsula Campaign, Robert E Lee decided to strike north towards Washington. In the meantime, the Union had ordered John Pope’s Union Army of Virginia to strike south from Manassas, to threaten Richmond and thereby take the pressure off McClellan. However, the Confederates were quicker off the mark and before Pope’s army could concentrate, Thomas ‘Stonewall’ Jackson’s 24,000 men were already advancing north along the eastern side of the Blue Ridge Mountains, driving back Pope’s cavalry picquets and making a bee-line for the huge Union depot at Manassas Junction. The only Union force in position to oppose Jackson was Nathaniel Banks’ II Corps of the Army of Virginia, which was positioned south of the town of Culpepper Courthouse.
However, the weather was scorching and the Confederate troops suffered in the heat as they marched north. The Confederate generals were also suffering, as Jackson was being characteristically secretive about his plans. Consequently, as battle was joined along the Cedar Creek, an indecisive artillery duel commenced between Winder’s and Ewell’s Confederate Divisions and the Union II Corps while the confused Confederate commanders waited for detailed orders to come from Jackson.
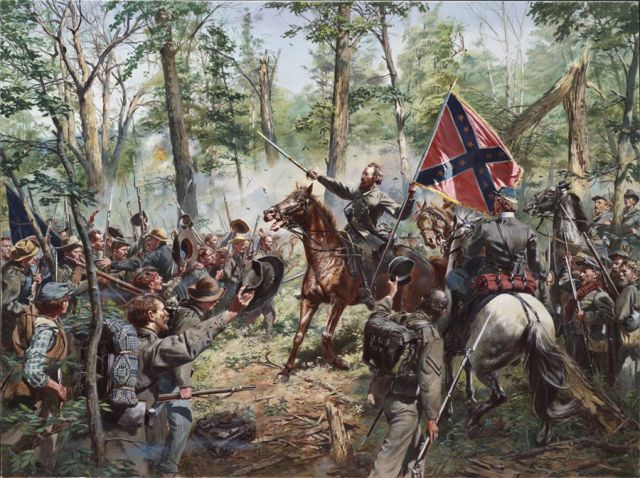
However, Nathaniel Banks was about to seize the initiative in spectacular fashion: as the exhausted and bewildered Confederate troops settled into their new position, Crawford’s Union infantry brigade burst like a tidal wave upon Winder’s Division, rapidly rolling up the flank and forcing Jackson to draw his sword for the one and only time of his Confederate career as he tried desperately to rally his men. It didn’t help matters that General Winder had also been killed by Union artillery during this moment of crisis. All seemed lost, but then A.P. Hill’s ‘Light Division’ arrived and first halted, then drove the Union troops back. Ewell’s divisional also came down from its dominant position on Cedar Mountain and drove into the Union flank. Jackson had snatched victory from the jaws of defeat, but would our game repeat or change history…?

 Order of Battle, II Corps of the Union Army of Virginia – Brigadier General Nathaniel P Banks (1 Corps Leader)
Williams’ Division (1 Leader)
Crawford’s Brigade (E): 12 bases [12/8/5, Crack, Rifled Musket]
Gordon’s Brigade: 13 bases [13/9/6, Veteran, Rifled Musket]
Auger’s Division (1 Leader)
Geary’s Brigade (E): 7 bases [7/6/4, Crack, Rifled Musket]
Prince’s Brigade: 9 bases [9/7/5, Green, Rifled Musket]
Greene’s Brigade (E): 4 bases [4/3/2, Veteran, Rifled Musket]
Cavalry Brigade
Bayard’s Cavalry Brigade: 8 bases [8/6/4, Experienced, Breech-Loaders]
II Corps Artillery Reserve
1st Battery [Experienced, Light Rifles]
2nd Battery [Crack, Napoleons]
3rd Battery [Crack, Heavy Rifles]
4th Battery [Experienced, Napoleons]
5th Battery [Veteran, Light Rifles]
6th Battery [Crack, Light Rifles]
 Order of Battle, Left Wing of the Confederate Army of Northern Virginia – Brigadier General Thomas J ‘Stonewall’ Jackson (1 (E) Corps Leader)
Ewell’s Division (1 (E) Leader)*
Early’s Brigade (E): 11 bases [11/10/8, Crack, Rifled Musket]
Forno’s Brigade*: 18 bases [18/14/9, Veteran, Rifled Musket]
Trimble’s Brigade (E)*: 13 bases [13/10/7, Experienced, Rifled Musket]
1st Battery* [Experienced, Mixed Rifles & Napoleons]
2nd Battery* [Experienced, Mixed Rifles & Napoleons]
3rd Battery [Experienced, Napoleons]
Winder’s Division (1 Leader)
Ronald’s (Stonewall) Brigade: 7 bases [7/6/5, Veteran, Rifled Musket]
Garnett’s Brigade: 6 bases [6/5/4, Green, Rifled Musket]
Taliaferro’s Brigade (E): 9 bases [9/8/7, Green, Rifled Musket]
1st Battery [Experienced, Light Rifles]
2nd Battery [Experienced, Mixed Rifles & Smoothbores]
A P Hill’s ‘Light’ Division (1 (E) Leader) †
Branch’s Brigade†: 13 bases [13/11/9, Experienced, Rifled Musket]
Archer’s Brigade†: 13 bases [13/10/7, Veteran, Rifled Musket]
Thomas’ Brigade: 13 bases [13/10/7, Crack, Rifled Musket]
Pender’s Brigade†: 13 bases [13/10/7, Crack, Rifled Musket]
1st Battery† [Experienced, Mixed Rifles & Smoothbores]
2nd Battery† [Veteran, Mixed Rifles & Napoleons]
Scenario Notes
* The bulk of Ewell’s Division (except for Early’s Brigade) is positioned on Cedar Mountain and Ewell is reluctant to move off this key piece of terrain until the rest of Jackson’s force arrives and the Union positions are positively identified. These units will therefore remain in position until Turn 5 (1900hrs). Note that Early’s Brigade plus one battery has already been moved to reinforce Winder and may be moved as normal.
† The bulk of A.P. Hill’s Light Division will arrive as reinforcements on Turn 1, in March Column at Point A. The artillery batteries are at the back of the column. Note that Thomas’ Brigade is already on table.
Leaders marked with ‘(E)’ are Exceptional Leaders.
The Union army will be considered to have suffered Heavy Casualties once it has lost 18 troop or battery stands.
The Confederate army will be considered to have suffered Heavy Casualties once it has lost 37 troop or battery stands.
The scenario starts at with the Union 1740hrs turn and lasts for eight 20-minute turns, ending with the Confederate 2000hrs turn.
The last two turns (1940hrs and 2000hrs) are Twilight turns. Maximum visibility will be reduced to 48cm (24 inches in the standard rules) during the 1940hrs turn and then to 24cm (12 inches) during the 2000hrs turn.
Note that these unit ratings are drawn from the original 1st Edition ratings, with the 2nd Edition’s ‘Army Generator’ used to plug the knowledge-gaps. Note that the morale ratings, especially for the Confederates are weighted downward due to the extreme heat that affected both sides, but especially the Confederates due to their hard march. Units will therefore reach ‘Worn’ and ‘Spent’ state very quickly, so the players need to pay close attention to their unit labels and Victory Point objectives.
Each square on the map is one foot when playing at our reduced scale for 10mm figures. 20mm in our games is equivalent to a game ‘inch’ (i.e. reduced by 1/5th). The table should be 6×5 feet when playing with normal Fire & Fury scales.
Special Rules
Crawford’s Charge
During Turn 1 only, Crawford’s Union Brigade may make a Double-Quick move in order to charge Garnett’s Confederate brigade. Crawford does not have to roll on the Manoeuvre Table for this turn only. Garnett has been taken completely by surprise and may not fire or claim the +1 Favourable Ground combat modifier for occupying woods.
Union Withdrawal
Union units may at any point in the game, exit the table at Point B. By doing so, they will not count as having Quit the Field for the purposes of Confederate Victory Point (VP) calculation (though withdrawn Worn and Spent units will still provide the Confederates with VPs as normal).
Victory Conditions
The winner is the side which has accumulated the most VPs by the end of Turn 8. VPs are earned at the following rate:
1 VP Each Worn enemy brigade.
1 VP Each wrecked or captured enemy battery.
1 VP Each killed, wounded or captured Corps or Division Leader or exceptional Brigade Commander.
2 VP Each Spent enemy brigade.
4 VP Each enemy brigade that quits the field or is destroyed.
2 VP (Union only) When one more unspent Union brigade occupies the Key Position, namely the crestline between X & Y, at the end of each Union turn.
The above list is taken from the original scenario, though having played it through I would retrospectively suggest a –5 VP penalty for an army that reaches its Heavy Casualties limit.
Terrain
The map above is a simplified version of the original scenario map. The original scenario maps are often quite difficult to recreate if you don’t have access to ‘Geo-Hex’ type terrain, which can accurately model contours, so I’ve done my best to redesign the map to a more ‘typical’ (at least for us) wargame table of flat terrain with a few isolated hills… In reality the hill in front of Ronald’s Brigade is a higher hill and the two ridges are spurs extending from that hill.
Woodland – All woodland is classed as Rough Ground and conveys a +1 Favourable Ground combat modifier and a -1 Partial Cover shooting modifier.
Rivers – Both forks of the Cedar Creek are classed as Rough Ground. The two minor tributaries of the Cedar Creek are classed as Broken Ground. Units in March Column formation may cross rivers at full speed via one of the bridges or at Broken Ground speed if crossing the Cedar Creek at Major’s Ford. Troops defending either type of riverbank gain a +1 Favourable Ground combat modifier.
Roads – Units in March Column formation may gain the Good Road Bonus when marching on the Orange-Culpepper Road or the north-south road that runs parallel to and to the rear of the Union lines. All other roads are classed as Open Ground.
Farms – The farms are all simply decorative. They do not block line of sight and may not be occupied. They may be moved for game purposes. Note that the valley between the two armies was heavily planted with corn and wheat, though these have no effect in this scenario.
Hills – Troops defending hills gain the +1 Favourable Ground combat modifier. Crestlines are marked by fences.
The Game
My apologies for the poor quality of these photos – the room is quite dark and lit with spotlights, which makes photography tricky!

Above: The battlefield as seen from the south, looking from Cedar Mountain and the Slaughter house, across the Cedar Creek and up the valley between the opposing armies.
 Above: The bulk of Ewell’s Division (Trimble’s Brigade, Forno’s Brigade and a pair of batteries) is deployed on the Cedar Mountain, which dominates the surrounding landscape. Ewell is quite comfortable in this position and as a consequence, won’t come down off his hill until Turn 5!
 Above: The rest of Ewell’s Division; namely Juball Early’s Brigade and a third battery of artillery, is stationed on the right flank of Winder’s Division, directly opposite the Union army.

Above: To Early’s rear, the first brigade of A.P. Hill’s ‘Light’ Division (Thomas’ Brigade) has just arrived and has moved into a reserve position on the rear slope of the spur.

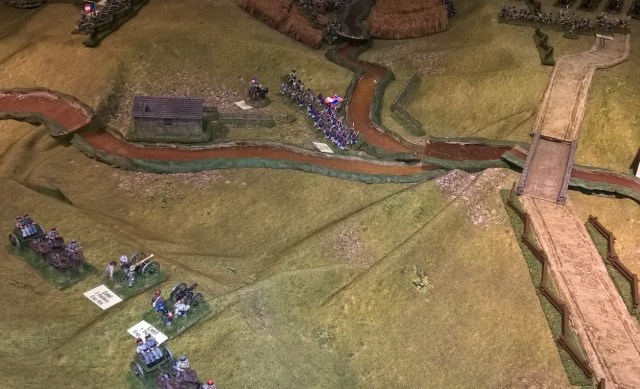
Above: To Early’s left, Taliaferro’s Brigade forms a long line as far as the Newman House, where Jackson and Winder have their headquarters. Winder’s two batteries take up position along Taliaferro’s front and have already engaged in a duel with the Union artillery opposite. North of the main Orange-Culpepper Road, Garnett’s Brigade occupies a somewhat exposed position forward of the main line, on the corner of the woods.

Above: On the extreme left flank of the Confederate army, Ronald’s ‘Stonewall’ Brigade occupies an isolated position along the edge of the woodland. This poorly-chosen position meant that he was unable to support the rest of Winder’s Division, but it did mean that this brigade escaped the worst of the disaster that was to befall the division.

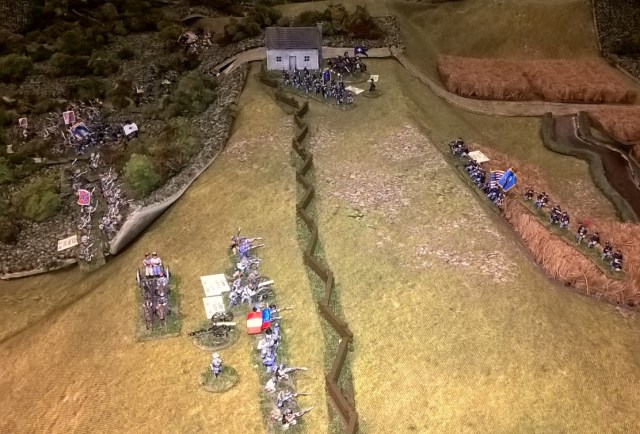
Above: The Union line as seen from the north, looking south toward Cedar Mountain. On the extreme right flank of the Union II Corps is Williams’ Division; Crawford’s Brigade has spotted an opportunity and is already pushing forward toward Garnett’s exposed Rebels on the other wise of the wheatfield. To Crawford’s rear, Gordon’s Brigade is moving up through the woods to cover the right flank, while Bayard’s Cavalry Brigade is in reserve. On Williams’ left, the bulk of Auger’s Division is also moving forward; Geary’s Brigade is just south of the main road and Prince’s Brigade is on the left flank of the advance.

Above: To the rear of Auger’s Division, six batteries of artillery pour a colossal weight of fire on to the unfortunate Rebels. Greene’s tiny brigade meanwhile guards the left flank and watches for any movement from Cedar Mountain. However, Greene is already coming under fire from Ewell’s artillery, positioned high on the slopes of the mountain.

Above: With a huge cheer, Crawford’s Brigade rushes forward with bayonets fixed, to engage Garnett’s Brigade. The shocked Rebels are too surprised to effectively return fire and Winder’s artillery similarly fails to have any effect. The Union artillery support however, is devastating; damaging one Rebel battery, silencing another and causing casualties on Taliaferro’s Brigade. Crawford’s men fire a volley as they go in, causing significant casualties to Garnett’s Brigade at the worst possible moment… As the charge impacts, Garnett’s Brigade completely disintegrates as panicked rebels throw down their arms and stream past Jackson’s headquarters! [In game terms, there had been a truly astonishing display of dice-rolling, with a difference of 15 points between the winning Union and losing Confederate rolls! Garnett’s Brigade was instantly annihilated]
 Above: On the Union left flank however, Greene’s Brigade is suffering under long-range fire from Cedar Mountain and very quickly loses 50% of its strength. Greene even has a horse shot out from under him, but soon recovers and ordered the neighbouring battery of heavy rifles to engage the artillery on Cedar Mountain. The Union heavies successfully silence Ewell’s guns for a while and win Greene a reprieve, but for how long?

Above: Jackson attempts to regain the initiative by launching an immediate counter-attack against the advancing Bluebellies. Early’s Brigade, with Thomas in support, wheels downhill in an attempt to engage Prince and Geary among the corn. Taliaferro meanwhile launches a charge past the Newman House, in an attempt to drive off Crawford.
 Above: However, all the confederate artillery on the spur has been silenced, damaged or driven off and the unchallenged Union guns shred the rash Confederate advance.

Above: Bayard’s Cavalry Brigade moves forward to perhaps exploit Williams’ success.
 Taliaffero’s men fight hard in what is an even fight, but are eventually forced to give ground and fall back behind the Newman House. Drawing his sword for the first time during this war, ‘Stonewall’ Jackson seizes a Battle Flag and rallies the wavering brigade. The cry goes up “Jackson is here!” and Taliaferro’s men throw themselves once again against Crawford! Crawford has a brush with death as one of his aides is shot along side him. However, the Rebels are once again hammered by artillery and the Rebel Yell dies in their throats as they are pushed back once again.
 Above: As Winder’s Division crumbles in the face of the determined Union assault, hope arrives in the form of A.P. Hill’s ‘Light’ Division!
 Above: Pender’s brigade of veterans leads the Light Division onto the field, followed by the brigades of Branch and Archer. However, these men are exhausted by the heat and hard marching.

Above: A.P. Hill can’t arrive soon enough, as joined by Geary’s fresh brigade, Crawford renews the assault on Taliaferro. Knowing that they can’t possibly hold for much longer, Winder orders his gunners to save the guns before drawing his sword and joining Jackson in the melee. North of the Newman House, Ronald’s ‘Stonewall’ Brigade attempts to come to Jackson’s aide, but they are intercepted by Gordon’s Brigade and are thrown back into the woods with heavy casualties.

Above: The combined weight of Crawford’s and Geary’s Brigades is just too much for Taliaferro’s Brigade to withstand and like Garnett’s Brigade, disintegrates into a panicked mob. The Rebel artillery batteries, unable to extricate their guns from the dense woodland, are also overrun and captured by Crawford’s jubilant troops. Jackson this time is unable to save the situation and along with Winder and Taliaferro, is forced to flee along with the mob! Jackson and Winder both have horses shot out from under them, but manage to escape on foot. With Jackson missing, the Confederate Army is surely lost…

Above: As a jubilant Banks moves his headquarters forward to Jackson’s former position at the Newman House, the sight before him chills him to the bone; the road from Orange County is filled with advancing Rebel troops! Heedless to the danger, Crawford and Geary push on into the woods, throwing back Thomas’ Brigade.

Above: The High Tide Mark – Crawford’s rampage finally comes to a halt on the far side of the woods as the enormity of the situation dawns upon him and Pender’s newly-arrived Rebel brigade prepares to charge! It was at this point that Alan (playing Banks) had to leave for work and left the Union army in my capable hands… What could possibly go wrong…?

Above: Meanwhile, on the far side of the woods, Gordon’s Brigade continues to push back Ronald’s ‘Stonewall’ Brigade with long-range musketry. [Note that Gordon’s Brigade included a single company of Zouaves – Collins’ Zouaves d’Afrique. This unit eventually went on to be expanded into the 114th Pennsylvania Volunteer Infantry, which I just so happened paint recently. This therefore gave me the perfect excuse to get them on the table… Even if Zouaves did only form a tiny portion of Gordon’s Brigade… 🙂 ]

Above: Back in the woods, Crawford decides that discretion is perhaps the better part of valour and withdraws his over-extended brigade back toward the Newman House. However, A.P. Hill is keen to take revenge for Winder’s crushed division and with sabre drawn, leads Pender’s Brigade in a wild charge through the woods. However, the charge quickly bogs down into a melee and the Rebels eventually get the worse of it, falling back in the face of stiff opposition by Crawford’s veterans. However, Crawford’s boys are now starting to weaken…

Above: As Pender’s Brigade, accompanied by A.P. Hill, takes on Crawford in the woods, Branch’s Brigade marches to the right flank to reinforce Thomas and Early. Archer meanwhile deploys his brigade defensively, supported by two batteries of artillery, just in case Pender should be unsuccessful and/or Gordon’s Zouaves or Bayard’s cavalry get around the flank.

Above: Having beaten back Thomas’ Rebels, Geary pulls back to the Newman House. Encouraged by Williams, Crawford also attempts to withdraw through the woods, but A.P. Hill and Pender aren’t going to let him get away that easily and charge again! Again, the Rebels are held off, but at a cost. Crawford’s Brigade is now starting to buckle and requests urgent assistance from Bayard and Gordon. They should REALLY be starting to withdraw, but Crawford’s plight persuades them to come to his aid…

Above: Back at Hudson’s Farm, an increasingly worried Greene pleads with Banks to provide him with some more artillery support, as that huge mass of Rebels on Cedar Mountain isn’t going to stand still for much longer! Banks agrees and sends three more batteries to his position. However, disaster strikes as Greene is killed by a direct hit from a Rebel gun firing from Cedar Mountain! Dismayed by the loss of their leader, Greene’s Brigade disintegrates, leaving the gunners to fend for themselves.
Above: Responding to the threat posed by Ewell’s Division on Cedar Mountain, Prince’s Brigade begins to pull back through the corn to defend the gun-lines and the army’s line of withdrawal back to Culpepper Courthouse.

Above: Branch’s Brigade marches down the Cedar Creek to relieve Early, who is still holding out at the southern end of the spur.

Above: Bayard’s cavalrymen dismount in the woods to provide support to Crawford’s right flank. Gordon is also moving forward on Bayard’s right.

Above: Jackson finally finds himself a fresh horse and urges Thomas to recapture the Newman House. the Rebel Yell is heard once again as Thomas’ men throw themselves at Geary! Banks now realises his fatal mistake: in moving the guns south to face Cedar Mountain, the Rebels no longer have to worry about Union guns sweeping the crest-line south of the Newman House. Thomas’ Brigade is completely unmolested as it charges Geary, who finds himself outnumbered 2:1 and is forced to give ground… The Union army has lost control of the key terrain!

Above: In the south, the Union gunners are dismayed to see the huge mass of Ewell’s Division moving down off Cedar Mountain, aiming to roll up the Union left flank. After firing a few desultory rounds, the four rifle batteries withdraw, leaving the two 12pdr Napoleon batteries to irritate Forno’s Louisiana Tiger Brigade as it attempts to ford the Cedar Creek near Crittenden’s Farm.
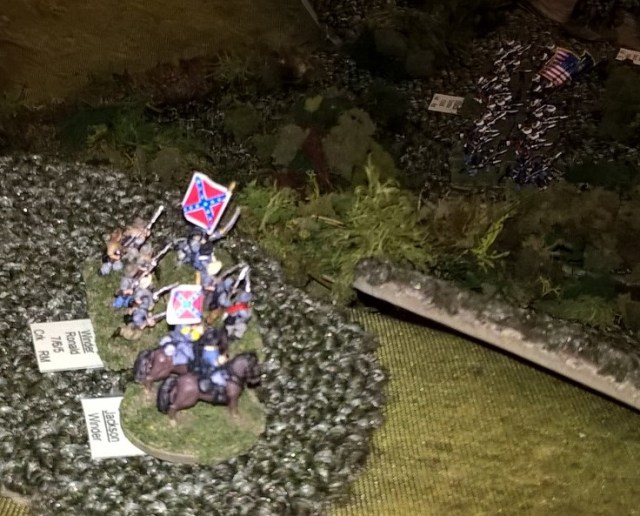
Above: But what happened to Winder? After finding a fresh horse, General Winder rode north in search of the last remnants of his division; the Virginians of Ronald’s ‘Stonewall’ Brigade. finding them broken and fleeing, Winder managed to rally them and bring them back to threaten the right flank of Gordon’s Brigade.
 Above: Banks’ II Corps now rapidly starts to collapse. A.P. Hill leads Pender’s Brigade in yet another charge through the woods. This time, despite the support of cavalry breech-loaders, the Union fire fails to halt the Rebels and Crawford’s gallant brigade is finally thrown back! Even worse befalls Geary at the Newman House, as a fresh assault by Thomas completely overruns the Union position. Geary himself was last seen attempting to rally a knot of men around the house, but was reported missing along with most of his men. His body was later recovered by the Confederate troops. and buried with honours by Jackson.

Above: Juball Early’s Brigade, having weathered the storm, now re-occupies its former position on the crest of the spur and is soon joined by Jackson and some fresh artillery from A.P. Hill’s Division. Branch’s Brigade meanwhile streams past as they move forward with Thomas to finish off Auger’s Division in the cornfields.

Above: Prince is unable to withdraw his brigade fast enough and is soon caught by Thomas and Branch with his back to the stream. Nevertheless, they manage to inflict damage on Thomas’ Brigade and perform a fighting retreat across the stream and back up through the cornfields.

Above: Auger, distracted by the plight of Geary’s and Prince’s Brigades in the valley, makes a truly fatal error… His position in the valley means that the bulk of the artillery finds itself without orders and unable to unlimber in order to face the tidal wave of Rebel infantry coming from the south! Auger then compounds this error even further by forgetting to move said artillery out of harms way! Trimble’s Brigade is swift to take advantage of this schoolboy error and overwhelms the nearest battery of 12pdr Napoleons. A breakthrough charge then sees the second battery captured! Auger moves up to the crest, but it is too late to do anything other than order the gunners to escape with their guns.
 Above: With casualties rapidly escalating, the Union army collapses! Bayard’s cavalry are swiftly defeated by Pender and mount their horses in order to escape further retribution from the vengeful Rebels. Gordon’s Brigade also turns about, aiming to beat the Rebels to Culpepper Courthouse…

Above: As the sun starts to set, General Auger escapes with the artillery train, but Prince’s Brigade finds itself trapped in the cornfield and surrounded by the brigades of Thomas, Branch and Trimble. They attempt to continue their fighting withdrawal, but are quickly outflanked and annihilated.
 Above: As the sun sets, the guns on Cedar Mountain finally fall silent.
 Above: As the sounds of battle diminish, General ‘Stonewall’ Jackson regains his original position near the Newman House and gives thanks for the day’s victory and thanks that General Banks has ‘snatched defeat from the jaws of victory’!
In conclusion, the Union side actually won the game ‘on points’, but I don’t think there’s a cat in hell’s chance that this could ever be considered to be a victory! They had earned 8 VPs for Garnett and Taliaferro having quit the field, 4 VPs for Early and Ronald being Spent, 2 VPs for Pender and Thomas being Worn, 2 VPs for capturing two batteries and a further 8 VPs for having occupied the spur for 4 turns. A total of 24 VPs. The Rebs on the other hand, had earned 12 VPs for Geary, Greene and Prince having quit the field, 2 VPs for capturing two batteries, 2 VPs for Crawford being Spent and 2 VPs for having killed Greene and Geary, for a total of 18 VPs. However, the Rebels had also inflicted Heavy Casualties on the Union army and had cut them off from their line of retreat. I think therefore that the VPs for this scenario need a little work, as it definitely did NOT feel like a Union victory! 🙁
Thanks once again to all at Carmarthen Old Guard, especially to Alan and Andy for making it such a good game.
[Edited to add the game labels]:

Great looking game and AAR. Another scenario I may have to pinch.
Cheers Jabba!
Wonderful looking table once again! We played this scenario several years ago and enjoyed it. Now that you’ve kindly retrofitted it for the revised rules we’ll have to do it again. I’m still working on making trees and buildings for ACW, but hopefully done soon
Cheers Jeff. Yes, I tried to match the 1st Edition unit quality ratings to the 2nd Edition Crk/Vet/Exp/Grn ratings, which was fairly straightforward, though establishing the morale ratings is a little trickier. I took the view that given the extreme heat, hardly any units would be ‘Spirited’ in this scenario and the majority should be ‘Reliable’ at the most, with a lot of Confederate units being ‘Unreliable’ (i.e. rapidly passing from Fresh to Spent after only a few casualties). In retrospect, perhaps more Confederates should have been rated as ‘Unreliable’! 🙂
Oh and yes I need to get my trees finished… I’ve got around 200 based and sprayed brown, but they need the foliage to be stuck on… 🙁
Thank you, very nicely presented and a superb read
Cheers Norm! 🙂
Enjoyed reading your battle report
https://www.10mm-wargaming.com/
Take care
Andy
Cheers Andy! We’ve got another one coming up in a couple of weeks – we’re doing some playtesting for the new Fire & Fury scenario books.