
 As previously mentioned, my recent return to Seven Years War wargaming has meant that it’s all been wall-to-wall tricorns, muskets, red coats, lace and pointy-headed Germans around here. I felt I needed a break and what could possibly be better than the TOTALLY different American War of Independence…?
A recent conversation with my mate Antony Oakley got me digging through the hard-drive, looking for photos of our last AWI game; the Battle of Germantown, which we played all the way back in December 2009 (see my last post). That then prompted me to dig out my old 28mm AWI collection, which started life in 2005, when Mike Hickling (who then ran the manufacturing and sales side of AB Figures here in west Wales) gave me a couple of spare packs of Wargames Foundry AWI figures. These lovely, characterful figures were crying out to be painted…
 Jase Evans and I had been mulling over ‘doing something in 28mm’ for a while and this then lit the touch-paper… This also coincided with my mate ‘Eclaireur’ publishing the first edition of his superb British Grenadier! rules and Perry Miniatures starting their superb AWI range.
 Within six months we’d painted over 30 units between us and others soon joined the project, meaning that we were able to play some of the larger battles such as Monmouth and Germantown. With Eclaireur, I then also got involved in massive refights of the Battle of the Brandywine (at the National Army Museum, Chelsea) and the colossal Battle of Long Island (at the equally-salubrious South Mimms Services on the M25). Having then reached the pinnacle of AWI gaming, I moved on to other things and my AWI collection went back into the box and remained there until last Thursday…
As mentioned last time, all of the flags in my AWI collection are faded; some rather badly, so I’ve been engaged on a major-reflagging exercise and this time I’ve varnished the bloody things to prevent a repeat performance:
 As the title says, for our ‘Return’ game I chose the Battle of White Plains, which was fought on 28th October 1776. This scenario is the first scenario in Eclaireur’s British Grenadier! Scenario Book #1 and is a nice, small, club-night-sized game, with an interesting mix of unit types and troop qualities, so is ideal for giving the rules (and my memory) a good workout.

Lieutenant General William Howe
The Battle of White Plains was one of a series of battles fought within what is now New York City. Lieutenant General William Howe’s British-Hessian army had captured Long Island in August 1776, but Washington’s army managed to escape across the water to New York City (which was then limited to the southern tip of Manhattan Island). In September Howe launched an amphibious assault on Manhattan, but despite capturing New York City, he again allowed Washington’s army to slip away. Howe’s pursuit of Washington was held off at Harlem Heights, thus allowing Washington to escape for a THIRD time, across the water to the Bronx peninsula.


Lieutenant General George Washington
By the time Howe, stung by criticism of his lethargic offensive, finally crossed over to continue his pursuit of the rebel army in late October, Washington had fortified a series of lines across the northern end of the peninsula at White Plains, securing his flanks on the Bronx River to the west and a group of lakes to the east. However, Chatterton’s Hill, on the west bank of the Bronx River was only lightly defended and offered Howe a way to outflank Washington’s main line. A combined British-Hessian force under the Hessian Lieutenant General Leopold Phillipp von Heister was therefore ordered to cross the river, take Chatterton’s Hill and outflank Washington’s lines.

Lieutenant General Leopold Phillip von Heister
However, the Hessians were delayed by a broken bridge and while Oberst Johann Rall’s Hessians conducted a repair, Washington used this valuable time to move an additional brigade to that location, though they were still sorely outnumbered by the Crown forces.
In the meantime, Major General Alexander Leslie, commanding the British half of Von Heister’s force, discovered a practicable ford further downstream and without waiting for authority, crossed over and supported by a large mass of artillery firing at long range from the eastern bank, launched an immediate assault on the rebel position.
Being heavily outnumbered and generally outclassed by the British-Hessian opposition, this is an impossible scenario for the Americans to win outright. The American scenario-objective is therefore to inflict more casualties than they suffer. Simply inflicting more casualties will be considered a draw, while inflicting one-third more casualties than they suffer will be considered an American victory.


Colonel Alexander McDougall
Above: The opening situation from behind the American position. Colonel Rufus Putnam’s small militia brigade has managed to dig in on top of Chatterton’s Hill, along with Captain Alexander Hamilton’s small battery of six-pounders (just two guns, represented by a single model). Colonel Haslet’s excellent battalion of Delaware Continentals are deployed further forward, along with the 1st Connecticut State Levies deployed as skirmishers. The recently-arrived brigade of Colonel Alexander McDougall has taken post in reserve, behind the hill.
Being the senior officer present, McDougall has taken command of the entire force, leaving his second-in-command to lead his brigade. McDougall is here represented by my George Washington group, complete with headquarters flags (I really must paint a new American army command group for those battles where Washington wasn’t present!).
In the distance, at the far left corner of the table, Rall’s Hessians wait for the bridge repairs to be completed. On the heights next to them, Brigadier Samuel Cleaveland’s artillery begins its bombardment of Chatterton Hill. On the far edge of the table, Major Maitland’s British-Hessian advance guard brigade begins to skirmish with Haslet’s men.


Colonel Rufus Putnam
Above: Colonel Rufus Putnam’s brigade consists of Brooks’ Massachusetts Militia Regiment (18 figures, Militia class), who are dug in behind hasty fieldworks, alongside Hamilton’s New York Artillery (one 6pdr gun, Line class) and Graham’s New York Militia Regiment (9 figures, Levy class), who are deployed as skirmishers.
In the foreground are the massed Continental light companies from McDougall’s brigade, deployed as skirmishers.
The fieldworks themselves are a fairly minor affair, providing some cover from fire, but only really being a ‘speedbump’ to assaulting troops.
 Above: McDougall’s brigade consists of four battalions of infantry; the Maryland (18 figures, Line class), 1st New York (12 figures, 2nd Line class), 3rd New York (16 figures, 2nd Line class) and 19th Continental (12 figures, 2nd Line class) Regiments, plus the massed skirmishers (8 figures, 2nd Line class) and Hamilton’s battery, which has been attached to Putnam.
I (in the role of McDougall) decided that it was madness to send this brigade up onto the hill or down the left flank, as they would be hammered by the great mass of British artillery firing across the Bronx River. I could keep them in reserve as a counter-attack force, but instead decided to send them around Putnam’s right flank and from there attack the British left flank as they attacked Putnam.


Colonel John Haslet
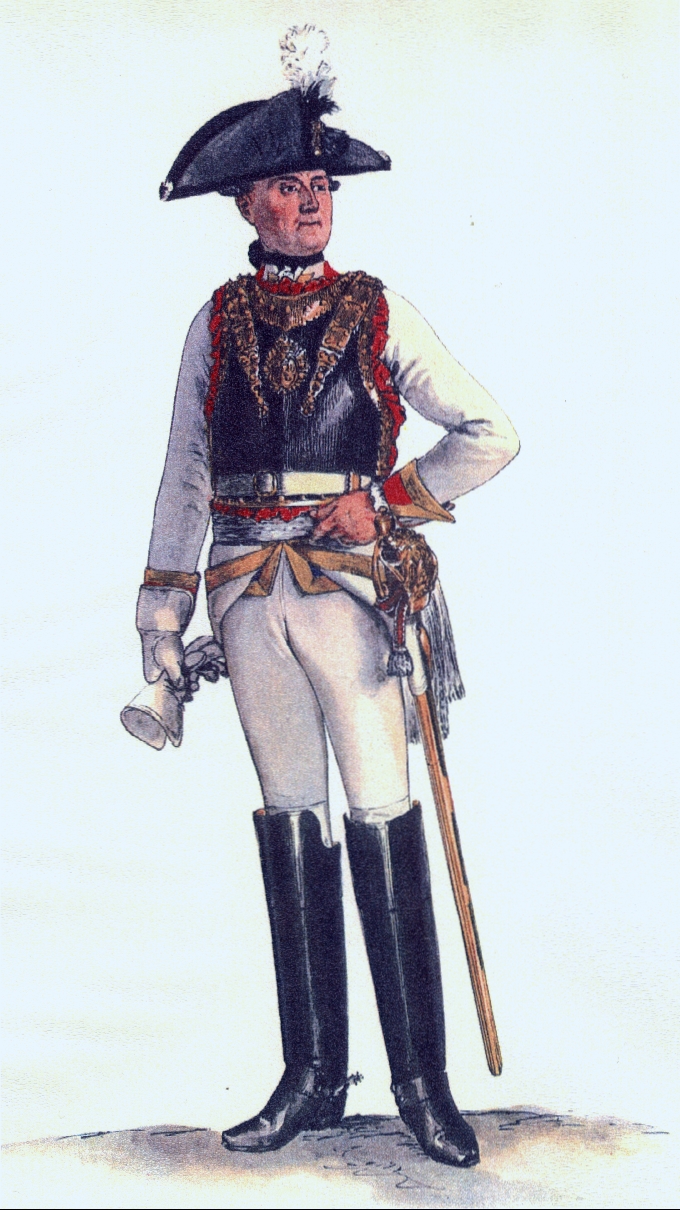
Above: Colonel John Haslet’s Delaware Battalion was arguably one of the best battalions in Washington’s army at this stage of the war. They were certainly one of the best-dressed, with blue coats, red facings, white smallclothes and yellow hat-lace (they are depicted in the painting at the top of this article, during the earlier Battle of Long Island). Nevertheless, I did mix in a few soldiers wearing hunting shirts and slightly more disorderly dress, as well as some different colourings of smallclothes and some without hat-lace. I painted the flag myself.
I think this was the last AWI unit I painted (in 2008 or 2009).
 Above: Brigadier Samuel Cleaveland’s artillery, positioned on high ground east of the Bronx River, opens fire on Chatterton’s Hill. Nearest the camera is a battery of 12-pounders (3 guns, Line class). For scenario purposes, this battery is immobile. On their left is a battery of 6-pounders (3 guns, Line class), which is mobile, but can’t cross the River Bronx, which makes their mobility somewhat moot. The 6-pounders therefore unlimber and join the long-range bombardment of Chatterton’s Hill.


Oberst Johann Rall
Above: Oberst Johann Gottlieb Rall’s Hessen-Kassel brigade waits on the eastern bank of the Bronx River, for the broken bridge to be repaired. Rall’s brigade consists of three regiments; Grenadier-Regiment ‘Rall’ (32 figures, Line class), Fusilier-Regiment ‘Knyphausen’ (32 figures, 2nd Line class) and the Leib-Musketeer-Regiment (24 figures, 2nd Line class).
These regiments were still using their regulation, dense three-rank drill, so are represented by one-third fewer figures (24, 24 and 18 respectively) and the Americans gain a +1 bonus when shooting at them, though the Hessians count their full roster strength when firing and fighting. They also have to halt and re-order their lines whenever they accumulate two or three Disruption Points (DPs).


Major John Maitland
Above: Major John Maitland’s British-Hessian advance guard contacts Haslet’s American advance guard. In the earlier part of the campaign, Major Maitland had been Commanding Officer of the combined 2nd Light Infantry Battalion and some sources state that this was the Honorable John Maitland of the Marines, who in October 1778 became Commanding Officer of the 1st Battalion, 71st Highlanders (shown in the portrait on the right). However, other sources state that he didn’t arrive in America until 1777, so this could be a different Maitland.
Maitland’s advance guard consists of the 3rd Light Infantry Battalion (12 figures, Elite class, comprising the massed Light Companies of the 15th, 28th, 33rd, 37th, 46th, 54th & 57th Regiments of Foot), the 17th Light Dragoons (8 figures, Line class), two companies of Hessen-Kassel Jäger (12 rifle-armed skirmishers, Elite class) and Grant’s Company of the New York Volunteers (3 skirmishers, Militia class, described in the original scenario as ‘Tory Scouts’).
 Above: Maitland’s Hessian and Tory skirmishers push forward, though initially get the worst of their firefight with the Connecticut State Levies skirmishing in front of them. Maitland could opt to deploy the 3rd Light Battalion in skirmish order, but elects to keep them formed in close order, to increase their impact in the assault. However, they soon become a target for Hamilton’s battery.
On the right, Rall’s Hessians have finally completed their repair of the bridge over the Bronx River.
 Above: The Patriots hunker down behind their breastwork and wait for the Lobsters to come to them.
 Above: Mc Dougall’s infantry swings to the right. However, they clearly need to practice their drill, as battalions collide and disrupt each others’ lines!
 Above: American skirmishers deploy forward to engage the enemy. However, in doing so, some of them unwittingly mask Hamilton’s artillery! Forcing him to temporarily cease fire.
 Above: Cleaveland’s guns are a fine sight as they hammer away across the valley. However, the range is long and they have very little effect on Hamilton’s dug-in guns or Putnam’s infantry. They switch their fire to the much closer groups of skirmishers…
 Above: The 3rd Light Infantry push on up the hill, screened by Grant’s Company of New York Tories. However, they are coming under intense skirmisher and artillery fire and the tiny group of Tories isn’t providing a very effective screen! As they get closer, Hamilton orders his gunners to load grape…
In the foreground, the Rall Grenadiers have crossed the bridge and begin to deploy on Leslie’s right.
 Above: On the left, the Hessian Jäger continue to have surprisingly little effect on the Connecticut Levies. However, the 17th Light Dragoons feel their sap rising as the Delawares appear to their front… The trumpeter sounds the Charge!
The Delawares level their muskets and fire a rippling volley into the foolhardy horsemen. Some of the Connecticut Levies also fire a few rounds into the mass of horseflesh… Astonishingly, the 17th Light Dragoons are completely unscathed and swords raised, charge into the blue-coated line!
 Above: The complete ineffectiveness of their volley has clearly taken the Delawares unawares and their line becomes unsteady just as the enemy cavalry charges home [in game terms, they had not only fluffed their volley, but now also fluffed their ‘Being Charged’ morale roll, incurring two DPs, which act as negative modifiers during melee].
 Above: The much-vaunted Delawares are given a thorough malletting by the Light Dragoons and lose half their number as they ignominiously retreat from the combat.
 Above: Having used up all the available ones during firing and melee, the Delawares now pick up the available sixes during their retreat move and collectively break the All-New England 500-yard Sprint Record… Nevertheless, the Delawares soon rally and move forward once again.


Major General Alexander Leslie
Above: Major General Alexander Leslie’s brigade now arrives in rear of Maitland’s advance guard. Leslie has four infantry battalions; the 5th Regiment of Foot (12 figures, Line class), the 28th Regiment of Foot (16 figures, Line class), the 35th Regiment of Foot (16 figures, Line class) and the 49th Regiment of Foot (16 figures, Line class).
As it happens, I don’t have any of these regiments in my collection, so I’ve just used four random regiments (the 38th, 43rd, 52nd & 63rd Regiments of Foot). These lads are all in the regulation 1768 Pattern uniform, but in reality the British infantry were largely wearing cut-down coats and slouched hats by this time. I’ve got a few units wearing that style of dress, but I need to get more. Any excuse…
 Above: With the Hessians having little effect on the rebel skirmishers, the 49th Foot (here played by the 38th) advance in close order to push them back.
 Above: Maitland watches the advance.
 Above: As does Leslie…
 Above: In an effort to clear Hamilton’s line of fire, McDougall’s skirmishers had wandered too far to the left and consequently come within grapeshot range of Cleaveland’s 12-pounders! The cover afforded by the rocky terrain offers only scant cover as a quarter of their number are shredded by grape! Shocked by their losses, the remaining men retreat behind Chatterton’s Hill, though retreat soon turns to rout and they flee the field.
 Above: Following their sabering of the Delawares, the 17th Light Dragoons manage to control their blood-lust and quickly rally. To their front, the rebel 3rd New York Regiment appears and engages the Light Dragoons with ineffective long-range musketry. The Hessian Jäger move quickly to screen the cavalry from any further fire.
 Above: The British infantry clear the woodland and push on up the hill. However, they come under heavy fire from Hamilton’s artillery and Brooks’ Massachusetts Militia and start to suffer losses. British orders require them to only engage the enemy with musketry and NOT to assault the enemy position, though their fire is proving ineffective against the dug-in rebels!
 Above: Concerned by the potential threat of enemy infantry appearing on the British left, Von Heister orders Rall to halt his deployment and instead directs him to take his brigade along the road to the left flank. While the ‘Rall’ Grenadiers sort themselves out, the ‘Leib’ Regiment and the ‘Knyphausen’ Fusiliers march to the left.
 Above: As the British infantry close on Putnam’s brigade, the 49th Foot and 3rd Light Infantry are suffering increasing losses from rebel fire and are doing precious little in return. Von Heister sends orders for them to go in with the bayonet, but it seems that the orders are not getting through!
 Above: “Pour it on, Boys!” Putnam places himself directly in the line of fire, behind the breastworks with the men of the Massachusetts Militia.
 Above: In the meantime, McDougall’s brigade continue their manoeuvre to the right, but have become thoroughly disordered by the move, so McDougall and his 2ic attempt to personally take control of the situation. In the meantime, the Connecticut Levies, threatened by the marauding light dragoons, fall back through the Continental lines to reform at the rear.
 Above: Having rallied from their earlier combat with the Delawares, the 17th Light Dragoons charge again, this time against the 3rd New York Regiment. The charge takes the New Yorkers completely by surprise and they fail to fire a volley at the charging cavalry!
 Above: The 3rd New York make a brave stand, but are quickly overwhelmed and are forced to retreat. Like the Delawares they lose around half of their number in the melee.
 Above: The 17th Light Dragoons become disordered in the melee and fall back to rally.
 Above: With the situation on Chatterton’s Hill threatening to get out of hand, Von Heister, Leslie and Maitland all converge on the position to take direct control of the engaged units.
 Above: Unlike the Delawares, the 3rd New York fail to rally following their tangle with the light dragoons and are soon fleeing northward!
Note that like the Delawares, these chaps are actually painted in the uniform recorded for the 3rd New York during this period, which was generally grey with green facings.
 Above: The 17th Dragoons try their luck once again against the Delawares, but this time are badly shot up and refuse to charge home!
 Above: At last, Von Heister manages to get orders through to Leslie and Leslie personally leads the 49th forward against the entrenchment! However, the 49th are again shot up by Brooks’ militia and stop short of the earthwork. The 3rd Light Infantry meanwhile, steadfastly refuse to advance into the teeth of Hamilton’s guns.
 Above: The view from the American side of the entrenchments.
 Above: Graham’s New York Militia skirmishers have fallen back behind the lines to rally, though are closely followed up by the British 5th Regiment of Foot (here played by the 52nd Foot with the buff regimental colour). The 5th Foot threaten to outflank the American line, but have also managed to mask their own guns (not that the guns have achieved very much)!
 Above: Rall’s Hessian brigade continues its march to the left flank.
Note that I don’t have the correct units for this formation, so the ‘Leib’ Musketeers at the front of the column are represented by the ‘Donop’ Musketeers and the ‘Knyphausen’ Fusiliers are represented by the ‘Lossow’ Fusiliers.
 Above: Oberst Rall waves them on their way.
 Above: Note that Oberst Rall is actually represented here by General von Donop. Hessian generals in this period didn’t have a prescribed uniform, so wore the uniform of their own regiment, in this case the straw-coloured facings of the ‘Donop’ Musketeers. The supporting grenadiers are from the grenadier company of the ‘Prinz Carl’ Musketeers, who formed part of the ‘Lengerke’ Grenadier Battalion.
 Above: The ‘Rall’ Grenadier Regiment has finally turned about and joins the rear of Rall’s column, though not before suffering a number of casualties from Hamilton’s artillery.
Again, I don’t have the ‘Rall’ Grenadiers in my collection, so have used the ‘Lengerke’ Grenadier Battalion, which was formed from the combined grenadiers of the ‘Prinz Carl’, ‘Donop’, ‘Wutginau’ and ‘Trumbach’ Regiments. The ‘Rall’ Grenadiers were an oddity in that they were a permanently-established grenadier regiment, rather than a combined grenadier battalion formed from elements of several different regiments. The ‘Rall’ Grenadiers also carried colours, unlike the combined grenadier battalions (they’re in my lead-pile and will be painted one day).
 Above: The British-Hessian commanders exhort their men as they attempt to launch a further assault on the entrenchment!
 Above: With the 3rd Light Infantry refusing to get stuck in, the 35th Foot are stuck behind them, unable to manoeuvre.
 Above: Over on the left flank, the Hessian Jäger continue to make life miserable for the Delawares.
 Above: The Delawares reciprocate and along with the 19th Continentals, succeed in shooting dozens of light dragoons out of the saddle! The 17th Light Dragoons have now suffered 25% casualties.
 Above: Colonel Haslet is right in the front line as he personally steadies the battered Delawares.
 Above: To their rear, McDougall is finally managing to sort out the disorder in the ranks and now hopes to swing his brigade round to the left, to hit the British infantry in the flank.
 Above: However, the British have got their flank attack in first and the 5th Foot seem set to charge! Hamilton decides that discretion is the better part of valour and swiftly limbers up his guns to make good his escape, screened by the skirmishers of Graham’s New York Militia.
 Above: Rufus Putnam, along with Brooks’ Massachusetts Militia, hold on in the entrenchments as long as they can, but are forced to disengage before they are rolled up by the 5th Foot. McDougall’s planned flanking movement meanwhile, has died on its arse from a combination of DPs and Rall’s approaching Hessians.
 Above: A last view of the British assault. The British had succeeded in taking Chatterton’s Hill, but had they suffered greater losses?
Sadly for the Americans, it was they who had taken the greater losses: The Delawares had lost 9 figures, while the 3rd New York had suffered 8 before fleeing. McDougall’s skirmishers had suffered the loss of 2 figures before they too had fled, for a total of 19. The British meanwhile had lost 4 from the 3rd Light Infantry, 2 from the 17th Light Dragoons, 2 from the 49th Foot and 3 from the ‘Rall’ Grenadiers, for a total of 11.
This was therefore a resounding victory for the Crown and the rebels only had themselves to blame for daring to take up arms against their rightful king!
All in all, a cracking game, enjoyed by all and we seemed to explore almost all areas of the rules, which was the plan. We had hoped to do another game tonight, but Andy has cried off sick, so we’re going to postpone until the 22nd, when we’ll refight the Battle of Bunker Hill.


 Evidence for the uniforms worn by the two Mainz regiments is extremely scant, being limited to just two 19th Century German cigarette cards painted by Richard Knötel (shown above); one showing a musketeer of the ‘Lamberg’ Regiment in blue facings and the other showing a grenadier of the ‘Kurmainz’ Regiment in green facings. There is also a Richard Knötel print showing various uniforms of the Reichsarmee, again showing a grenadier of the ‘Kurmainz’ Regiment. However, we simply don’t know what Knōtel’s sources were. Kronoskaf speculates that the facing colour for the ‘Lamberg’ Regiment may alternatively have been red, but the successor regiment in 1776 definitely wore blue.
 According to the cigarette card painting, the regiment’s coats were white, with lapels, cuffs and linings and in dark blue with white metal buttons and without lace. The buttons were grouped in pairs on the lapels and the Swedish cuffs each had three buttons. Waistcoats were dark blue and breeches were straw. Neck-stocks and gaiters were black. Belts were white. Hats had white lace edging with blue-over-white pompoms.
 It’s anyone’s guess what the dress was for officers and drummers, but I’ve given the officers metallic hat-lace and Austrian-style yellow sashes, while the drummers have white coats with blue lace. The drummers could just as easily have worn reversed colours, the personal livery of General Lamberg or the Archbishop, or something else entirely.
 When we did
 Above: The
  Above: The Gens d’Armes wore the typical pale straw-coloured Prussian cuirassier uniform, with collar, cuffs and cummerbund in red. Tail-turnbacks and shoulder-straps were pale straw. The cuffs, front-seam and tail-turnbacks were edged with regimental lace, which was red with a central yellow stripe. Buttons were yellow metal. Crossbelts and cartridge-boxes were white, edged with regimental lace. A black-enamelled cuirass was worn over the coat; this was edged in red and was held in place with white straps. Hats did not have lace edging, but did have black cockades and white corner-rosettes.
 Above: Sabretaches were red, edged with regimental lace and decorated with the crowned ‘FR’ cypher in yellow.
 Above: Horse-furniture was blue, edged with red lace, with three narrow yellow stripes, which as usual is impossible to paint at this scale! As always, you have the choice to either do a simplified version of the lace (as here), or an ‘average’ colour to represent how it looks at a distance (i.e. orange). Having decided to go for the simplified option with a single stripe, I unfortunately misread a colour plate; it looked like red stripes on yellow, so that’s what I did.
 Above: No Prussian dragoon regiments had historic titles and all were therefore known by the name of their regimental Chef.
  Above: As with all Prussian dragoon regiments of the period, the ‘Blanckensee’ Dragoons wore a distinctive cobalt blue coat. When I last painted Prussian dragoons (1995 or thereabouts), I was for some reason, using a lurid acrylic ‘electric’ blue, as shown in
 Above: The collar, cuffs, lapels and tail-turnbacks of the ‘Blanckensee’ Dragoons were white, the shoulder-strap was blue, buttons were yellow metal and a yellow aiguilette was worn behind the right shoulder. Officers had gold Brandenburg-style buttonhole lace and drummers’ lace was white with yellow stripes. Smallclothes were straw. The hat was unlaced, but had a black cockade and red corner-rosettes.
 Above: The ‘Blanckensee’ Dragoons’ horse furniture was white, edged with three narrow stripes in cobalt blue. The ‘FR’ cypher, coloured cobalt blue, was displayed at the rear corners of the shabraque and on the holster covers.
 Above:
  However, on 12th November 1757, Warnery along with half of his regiment, fell into Austrian hands when the fortress of Schweidnitz surrendered. Warnery was exchanged the following year, but had to endure a court-martial, at which he was cleared of any culpability for the surrender of the fortress. However, other officers were not so lucky and Warnery appealed to the court for his brother officers to also be cleared. In this he was unsuccessful and, considering this to be a stain upon his honour, Warnery resigned from Prussian service and retired to his wife’s Polish estates. There he became a celebrated military writer (his books included the excellent
  Above: At the start of the Seven Years War, each Prussian hussar regiment had ten squadrons, each of 115-116 men. This strength increased fairly randomly during the war from regiment to regiment, with most regiments having around 140-150 men per squadron (141 men being recorded for the ‘Möhring’ Hussars in 1759), which was significantly weaker than the average squadron strength of the cuirassiers and dragoons. In game terms, each hussar regiment usually operates as two five-squadron ‘battalions’ of 12 figures, as shown here, though an understrength regiment might operate as a single Large 16-figure unit, depending on the scenario.
 Above: The ‘Wartenberg’ Hussars wore a white dolman with yellow cuffs and collar and a blue pelisse with white fur edging (NCOs had brown fox-fur). Braid was yellow and buttons were yellow metal. Officers had gold braid, with a gold lace ‘frame’ around the braiding on the breast. Breeches were straw and the schalavary leggings were blue with yellow lace edging. Some sources show white edging and tassels to the boots, but there is some suggestion that these were a later addition, so I’ve left the boots plain. The barrel-sash was white and yellow (some sources show white and blue), with white ‘whips’, though officers had silver barrel-sashes.
 Above: The ‘Wartenberg’ Hussars wore dark brown busbies with plain white bags and white cords and flounders. Officers had gold cords and flounders. However, I noticed after painting these that Bleckwenn shows the trumpeters as wearing black mirlitons with short yellow plumes. It also shows the trumpeters’ lace and braid as mixed red & yellow (I did plain yellow – bah!).
 Above: Shabraques were blue with white vandycking, piped yellow. Officers’ shabraques had gold piping and were decorated at the front and rear corners with a white shield, edged and crowned with gold, bearing a black eagle.
 Above: Sabretaches were yellow, edged with white lace and decorated with the ‘FR’ cypher in white. They seem to have had a vandycked edge during the 1740s, but changed to a straight lace edge by the time of the Seven Years War. Officers’ sabretaches were edged with gold and were decorated with the same crowned eagle-on-shield design used to decorate their shabraques.

 In
In  Note also that Mark didn’t make any comment regarding the deployment of Stark’s two artillery batteries, so I just placed them on the flanks of his line. Feel free to stick them wherever you want within Stark’s deployment area.
 Above: The Calm Before the Storm. This was the best I could do with the fortifications very kindly loaned by Phil Portway. The fort itself looks fine, though the gateway should be mid-way along the parapet, according to the Page Map. However, we didn’t have suitable terrain-pieces to make the flêches, so had to make do with a straight length of parapet.
 Above: The view from behind rebel tax-evader lines. The forces of monarchy, order and stability mass in the distance. The green patches on the left are areas of soggy ground, where clay was extracted for making bricks (the brick kilns themselves being in the middle of the British start-line, though I don’t have any suitable models).
 Above: Stark’s brigade masses along the ‘rail fence’. According to Mark Hayes’ research, this was actually a stone wall, topped with rails and with another fence immediately in front, with the gap between the two stuffed with hay, so it was a significant obstacle.
 Above: The British have decided to ignore Stark’s fence-line position and instead decide to throw everything against the redoubt, supported by the artillery firing from the high ground to their rear. On the right, Howe has ordered the Light Infantry Battalion to disperse into skirmish order, to screen the advance of the Grenadier Battalion and a battalion formed by the combined 5th & 52nd Regiments of Foot.
 Above: On the left is Pigot’s brigade, consisting of the 38th Foot (yellow regimental colour), 43rd Foot (firing at the redoubt), the 1st Battalion of Marines (in the left-foreground) and a detachment of Light Infantry (skirmishers). They also have a battery of 6pdrs, but the guns presently lack ammunition.
 Above: As the British approach the redoubt, Gridley’s Battery and Frye’s Regiment open fire.
 Above: On the British left and as 12pdr rounds whistle overhead, the 43rd disregard the paltry rebel artillery to open a lively fire upon the defenders.
 Above: On the right, the swarm of British Light Infantry causes considerable disruption among Frye’s men defending the projecting ‘wing’ of the redoubt. Concerned that Frye might be wavering, both Prescott and Putnam ride over to steady the troops.
 Above: Howe urges the 5th/52nd and Grenadiers onward to glory!
 Above: Observing the distant British movements, Stark remains unengaged. He sends a request for orders, but with Putnam embroiled in the firefight for the redoubt, there is no reply.
 Above: In the flêches, the Massachusetts Militia stand ready to counter any British move around the flank, but as the firefight intensifies in Frye’s sector, that looks to be increasingly unlikely. These lads carry the famous ‘Bunker Hill Flag’ that was known to be carried by the Massachusetts Militia on the day.
 Above: In British Grenadier! rules, hits from fire initially become ‘Disruption Points’ (DPs), with three DPs being the maximum. DPs can also be accrued from movement, passing through rough terrain, crossing breastworks, etc. Any hits on a unit that already has three DPs then become permanent hits. Frye’s Regiment defending the breastwork, here has two DPs, as indicated by the two dots on the marker.
 Above: Putnam and Prescott ride forward to steady Frye’s beleaguered regiment. In British Grenadier! a unit can rally off DPs at the end of the turn, provided it has remained stationary and not in mêlée. Units of Line class may then rally off 1 DP, while Elite class units may rally off 2 DPs. Units of 2nd Line class may rally off 1 DP, provided they are not in a position that could be charged next turn. Attached Brigadiers and/or C-in-Cs will also rally off 1 DP each. Militia Class units therefore absolutely require an attached general in order to remove DPs, hence the personal intervention of both Putnam and Prescott. This of course, carries with it some personal risk for those generals.
 Above: Within the main redoubt, Prescott’s Regiment (here depicted by a red-coated unit) and Bridge’s Regiment (in the foreground) remain largely unengaged, except for some desultory long-range musketry. However, that is all about to change…
 Above: On Morton’s Hill, the British artillery has been hammering away at Frye’s Regiment. However, as the Light Infantry climb Breed’s Hill the guns are forced to switch their fire to Prescott’s Regiment on the left.
 Above: The Grenadier Battalion, resplendent in bearskin caps, follows in the wake of the skirmish screen.
 Above: Risking life and limb, Putnam personally inspires Frye’s Regiment to stand their ground. Putnam is actually my George Washington, complete with headquarters flags. I really do need to paint an alternative American army commander base!
 Above: Pigot’s brigade is struggling to push forward in the face of stiffening American fire. The 43rd in particular, are starting to suffer significant losses and Pigot rides forward to steady them. On the left, the Light Infantry detachment is pinned down by effective fire from Robinson’s Detachment of American skirmishers. Unwilling to wait any longer for the Light Infantry to make headway, the 1st Marines move forward, intending to push on through the skirmish screen.
 Above: Over on the right, the 5th/52nd Foot have already passed through their skirmish-screen and soon become engaged in a vicious, short-range firefight with Frye’s Regiment.
 Above: Almost the whole British line is now poised to launch its assault on the redoubt, though stiff fire from the defenders is making it difficult for the British to coordinate their attacks.
 Above: Urged on by the senior commanders, Frye’s Regiment pours a withering hail of fire into the 5th/52nd Foot, cutting down around 20% of their number!
 Above: However, the Americans aren’t getting it all their own way, as the 12pdrs fire at Prescott’s Regiment, smashing whole sections of the parapet and bowling down files of men…
 Above: The 38th and 43rd follow up with a pair of devastating volleys (three double-sixes in a row!).
 Above: The astonishing weight of fire suddenly poured into Prescott’s Regiment cuts down scores of men, leaving half of them dead or wounded! The surviving officers attempt in vain to hold the shocked survivors, but to no avail. The survivors flee from the fort, the officers among them!
 Above: The departure of Prescott’s Regiment leaves a yawning gap on the parapet between Sam Gridley’s tiny battery and Frye’s Regiment. Bridge’s Regiment is unengaged on the flank, but will take a little time to shift across to the threatened parapet. In the meantime, Sam Gridley’s gunners will have to hold as best they can.
 Above: Frye’s Regiment, already heavily engaged, is in no place to plug the gap! Prescott orders one of the unengaged regiments from the flêches to enter the redoubt, but that too will take time to achieve.
 Above: However, Fortune is fickle and she now smiles on the defenders, as the 5th/52nd Foor break and run!
 Above: The Grenadiers , who should have been closely supporting the assault, have been delayed by a combination of bad terrain, bad luck and long-range harassing fire from Stark’s light artillery, which causes a steady trickle of casualties.
 Above: Stark, seeing the British attack starting to waver, decides that he can’t wait any longer for orders to come from Putnam and instead orders his brigade to attack the weakened British right flank.
 Above: Astonishingly, the 38th and 43rd Regiments completely fail to take advantage of the open goal before them and instead continue their cautious advance up the slope to the glacis. The 1st Marines meanwhile, push through the rallying Light Infantry to join the assault.
 Above: Frye’s Regiment once again becomes the focus for large numbers of British skirmishers and loses a few men, though fires yet another devastating volley, cutting down a number of their tormentors!
 Above: To the rear of the parapet, Doolittle and Brewer move their militia into the redoubt.
 Above: Bridge meanwhile, has managed to form his regiment into a new line, facing the empty parapet.
 Above: Robinson’s Detachment meanwhile, continues to be a major thorn in the side of the British left flank. However, help is at hand for the British, as Clinton’s brigade (63rd Foot & 2nd Marines) has arrived and is marching to join the assault. The 6pdr Battery has also finally received its ammunition and is marching to support the British right flank against the new threat posed by Stark’s advance.
 Above: However, Stark’s advance has been slowed somewhat by having to climb over their fortification while under long-range heavy artillery fire from Morton’s Hill.
 Above: Stark brings his left-flanking battalion in to form a brigade reserve.
 Above: Although the 5th/52nd Foot are in retreat, the rest of the British line is finally poised to launch a single massive attack on the redoubt. Howe meanwhile, rides over to steady the Grenadiers. What happens next will decide the day!
 Above: With Howe’s attention fixed on getting the Grenadiers to move forward, the 5th/52nd Foot rout!
 Above: The 43rd Foot, having already suffered heavy losses from Gridey’s artillery and now seeing friendly troops routing, decide that have also had enough and join the rout!
 Above: With the 38th Foot pinned down by fire, the 1st Marines launch a desperate charge on Gridley’s artillery.
 Above: However, the Marines have already suffered considerable disruption thanks to Robinson’s skirmishers and as they reach the parapet, a whiff of grapeshot from Gridley’s 3pdrs cuts great swathes through their ranks!
 Above: With a third of the Marines cut down during their charge, they too join the rout, fleeing past the startled 2nd Marines! With two-thirds of his formed units now fleeing for their lives, Brigadier Pigot loses his nerve! The survivors of the 43rd Foot and 1st Marines disperse and flee in panic to the boats that will carry them back to safety! The 38th Foot and the left-flank Light Infantry detachment meanwhile, fall back from Breed’s Hill, leaving Howe’s right-flanking brigade alone on the slope of the hill.
 Above: As Doolittle’s Regiment fills the redoubt to their rear, Bridge’s Regiment finally regains possession of the parapet and the redoubt is safe!

 Well after two postponements, we finally got to play our
  * The Battle of Bunker Hill was actually fought on Breed’s Hill. The battle was mis-named partly because Colonel William Prescott, having been ordered to fortify Bunker Hill (which stands a short distance to the north), decided instead to fortify Breed’s Hill, but the historical record still showed that he had been sent to Bunker Hill. To compound this, a British map of the battle drawn by one Lieutenant Page (shown below) mistakenly reversed the names of the hills and so the name ‘Bunker Hill’ stuck!
 We based the shape of the redoubt in our scenario map on Lieutenant Page’s well-known map above. However, Page doesn’t show the well-documented flanking ‘flêches’, instead showing a straight breastwork. To add further confusion, another diagram of the redoubt (shown below) looks absolutely nothing whatsoever like the one shown on Page’s map!
 Suffice to say, there is considerable disagreement in the sources, so feel free to make it up…

 As recently mentioned, I was getting a bit bored with all those tricorn hats and mitre caps of the Seven Years War, so decided to dig out my old 28mm AWI collection with its TOTALLY different tricorn hats and mitre caps…
 There were four Hessian combined grenadier battalions in North America. Three (initially titled ‘von Block’, ‘von Minnigerode’ and ‘von Linsing’) were formed from the detached grenadier companies of line infantry (musketeer & fusilier) regiments and the fourth (initially titled ‘von Köhler’) was formed from the grenadiers of three garrison infantry regiments and the ‘flank’ grenadier company of the Grenadier Regiment ‘Rall’.

 Having fought under Cornwallis’ command for the remainder of the New York Campaign, Donop’s brigade continued to serve under Cornwallis for the remainder of 1776 and the invasion of New Jersey. During this time they were reinforced by the Grenadier Battalion ‘von Köhler’ and 42nd Highlanders.
 Above: When I was first building my Hessian force, neither
  Above: The Grenadier Battalion ‘von Block’, commanded by Oberstleutnant Justus Heinrich von Block, was formed from the Grenadier Companies of the Musketeer Regiments ‘von Wutginau’, ‘von Donop’, ‘von Trumbach’ and ‘Prinz Carl’. Command of the battalion changed in 1777 to Oberstleutnant Georg Emanuel von Lengerke and the battalion was thereafter known as ‘von Lengerke’.
 Above: The grenadiers of the ‘von Wutginau’ Regiment (here on the right of the photo or the left flank of the line) had red cuffs, but no lapels. On each side of the breast were four pairs of white lace buttonholes and a pair above each cuff. Smallclothes were pale straw.
 Above: On the right of the line is the grenadier company of the ‘von Trumbach’ Regiment (who became the ‘von Bose’ Regiment in 1778). They had white facings and smallclothes. They also had a pair of white lace buttonholes below each lapel and above each cuff.
 Above: A rear view of the ‘von Block’ Grenadiers, showing the colours of the mitre-caps. The front-plate and band of the cap always matched the regimental ‘metal’ colour, which here was yellow for all four regiments. The cap of the ‘von Wutginau’ Regiment (here on the left) had a red bag, piped yellow and a white pompom with a yellow centre. The ‘Prinz Carl’ Regiment had the same colourings, though with a light blue pompom. The ‘von Donop’ Regiment had a straw bag with yellow piping and pompom. Lastly, the ‘von Trumbach’ Regiment had a white bag with red piping and pompom.
 Above: The Grenadier Battalion ‘von Minnigerode’ was initially commanded by Oberst Friedrich Ludwig von Minnigerode and consisted of the Grenadier Companies of the Fusilier Regiments ‘Erbprinz’, ‘von Ditfurth’, ‘von Lossberg’ and ‘von Knyphausen’. In 1780 command of the battalion passed to Oberst Wilhelm von Löwenstein and was thereafter known as Grenadier Battalion ‘von Löwenstein’.
 Above: The ‘Erbprinz’ Regiment had crimson facings decorated with white buttonhole lace, white ‘metal’ and white smallclothes. The officers’ uniform should be decorated with silver buttonhole lace, but Hessian officers, like their British comrades, tended to remove their coat-lace while on campaign in America. It’s often said that this was done to avoid marking them out as officers to enemy marksmen, but the retention of their gorget and silver & red striped officers’ sash would tend to make that rather pointless! Silver and gold lace buttonholes were expensive items, so they were probably removed merely to save them from being lost or tarnished on campaign.
 Above: The grenadiers of the ‘von Ditfurth’ Regiment had yellow facings, with white lace edging to the lapels and cuffs. ‘Metal’ was white and smallclothes were white.
 Above: On the opposite flank of the line stand the grenadiers of the ‘von Lossberg’ Regiment. This regiment had orange facings without lace decoration, yellow ‘metal’ and white smallclothes. The NCO on the flank has gold lace edging to cuffs and lapels as a mark of his rank.
 Above: For some reason I didn’t do a close-up of the ‘von Knyphausen’ Regiment’s grenadiers. They had black facings without lace, yellow ‘metal’ and pale straw smallclothes. They’re the second base from the left, including the gauntleted officer firing his musketoon.
 Above: A rear view of the ‘von Minnigerode’ Grenadiers, showing the colourings of grenadier caps and tail-turnbacks. The caps of the ‘Erbprinz’, ‘von Ditfurth’ and ‘von Lossberg’ Regiments each had a bag in the regimental facing colour, with a facing-coloured pompom and white piping. The caps of the ‘von Knyphausen’ Regiment had a pale straw bag and pompom, with red piping.
 Above: The Grenadier Battalion ‘von Linsing’ (also referred to as ‘Linsingen’) was commanded by Oberstleutnant Johann Wilhem von Linsing (or possibly ‘Linsingen’) and consisted of the Grenadier Companies of the 2nd & 3rd Battalions of the Guard and the Musketeer Regiments ‘Leib’ and ‘von Mirbach’.
 Above: Another view of the Grenadier Battalion ‘von Linsing’. I do love these goose-stepping Hessians… 🙂
 Above: The grenadiers of the 2nd and 3rd Battalions of the Guard Regiment wore near-identical uniforms, namely red facings with broad white buttonhole lace, white ‘metal’ and lemon yellow smallclothes. Most unusually, the red & white-striped ‘lion rampant’ of Hesse was enameled in full colour on the front-plate of their caps (for all other regiments the badges were merely embossed). Both units had red bags to their caps, piped white with a white pompom.
 Above: The grenadiers of the ‘Leib’ Regiment had lemon yellow facings, white buttonhole lace, white ‘metal’ and lemon yellow smallclothes.
 Above: The grenadiers of the ‘von Mirbach’ Regiment had poppy red facings with white lace edging, white ‘metal’ and white smallclothes. In 1780 the ‘von Mirbach’ Regiment became the ‘von Jung-Lossberg’ Regiment.
 Above: A rear view of the Grenadier Battalion ‘von Linsing’. All four constituent regiments had poppy red tail-turnbacks and white ‘metal’. The ‘Leib’ Regiment had a yellow bag to its grenadier cap, which was piped white with a white pompom. The other three regiments all had a poppy red bag with white piping. The 2nd & 3rd Guards had a white pompom, while the ‘von Mirbach’ Regiment had a light blue pompom.
 Prior to
  Above: Grenadier Battalion ‘Wedell’ (1/23) was formed from the combined grenadier companies of the
  Above: Both constituent regiments had red, Brandenburg-style cuffs, linings and neck-stocks, with white small-clothes, white ‘metal’ and a blue shoulder-strap. The men of IR 1 also had red lapels and collar. Both regiments had simple white lace buttonholes, with three pairs on each side of the breast/lapels and one pair below, with another pair above each cuff. IR 1 also had a pair of lace buttonholes on each tail-pocket. The officers of IR 1 had silver lace edging to the lapels and cuffs, while the officers of IR 23 had silver lace buttonholes.
 Above: Both regiments had silver-fronted caps with a blue back and white band. Those of IR 1 had white piping with a white pompom. Those of IR 23 had red piping and a white pompom with a speckled red top (appearing pink at a distance).
 Above: The
  Above: My Garde Regiment has a complicated history… I initially painted the I. Leibgarde Battalion in 1996 or thereabouts (using the ‘corn-fed’ Lancashire Games Mk 2 figures) for a big club demo-game of the Battle of Kolin. I then added the III. Battalion at some point using Old Glory 15s figures, but never got around to painting the II. Battalion. Then this year in a fit of enthusiasm, I decided to
  Above: In full dress, the
 Above: The
  Above: The
  Above: The grenadier cap of the III. Battalion of the Garde had a silver front, an ornate silver band, a yellow cloth back, piped silver and a white pompom with yellow centre. The detached flank-grenadier company wore the same cap as the other battalions (having a red back with white pompom and red centre).


 In
In  The artillery held a very high status in the Hanoverian army, but was consequently very conservative and resisted efforts at modernisation. For example, 3pdr guns were retained as battalion guns throughout the Seven Years War, whereas the British and Prussian armies were moving toward 6pdr pieces in that role (Hanoverian 6pdrs were heavy pieces, being only used for position battery work). They also resisted a proposed move to the excellent and much lighter/shorter Schaumburg-Lippe-Bückeburg 12pdr for their heavy position batteries. Hanoverian guns and carriages were therefore generally heavier and more old-fashioned than their peers. Nevertheless, the Hanoverian artillery remained numerous and effective throughout the Seven Years War.
 As with the rest of the Hanoverian army, artillery uniforms were very British in cut, though colourings were markedly different (the figure on the left in the painting above is a Hanoverian artilleryman and the other two figures are Hanoverian Foot Guards). The coat was a distinctive light blue colour, with lapels, cuffs and linings in red (no collar, shoulder-straps or lace). Sources are split on button-colour; Kronoskaf says white metal, but all the pictorial evidence suggests yellow metal, which also matches the gold-yellow hat-lace. I’ve gone with yellow metal.
 Waistcoats were red. Breeches and belts were buff. Gaiters were white, secured below the knee with a buff leather strap. They also wore a belly-box in either buff or whitened leather, decorated with a yellow metal badge (shown variously as either a crowned circular Badge of Hanover or as a flaming grenade).
 Guns were polished brass, while gun-carriages and equipment were painted red, with black ironwork. These are a mixture of
  Anyway, that’s it for now! There’s more SYW to come (isn’t there always…?), including freshly-painted Hanoverian cavalry, a load of Prussians, and some more Reichsarmee. I’ll also be photographing my old 28mm AWI collection over the next few weeks and we’ll be refighting the Battle of Bunker/Breed’s Hill later in the month.

 Anyway, onto the Germantown photos…
 Above: The British army viewed from their right flank. Facing us is Major General James Grant’s Brigade, consisting of the 1st Light Infantry Battalion, 4th, 5th, 49th & 55th Regiments of Foot and the Queen’s Rangers.
 Above: Another view of Grant’s Brigade. The green-coated Queen’s Rangers have deployed into skirmish order, but the regimental cadre, with the colours, remains formed to their rear as a rallying-point.
 Above: Grant’s Brigade seen from the opposite flank. In the foreground are the 1st Light Infantry and in the distance is Mathew’s Foot Guards Brigade.
 Above: The vital crossroads is held by the brigades of Major General Charles Grey (15th, 17th & 44th Regiments of Foot) and Major General Agnew (33rd, 37th, 46th & 64th Regiments of Foot). In front of them is positioned a large battery of guns and the Commander-in-Chief, General Sir William Howe.
 Above: Having spotted the approach of General Greene’s rebel division, Grant wheels his brigade to the left, seemingly unconcerned by another column of rebels approaching his right flank. The large house in the distance is the ‘Chew’ or ‘Cleveden’ House; a solid, stone-build construction that is presently garrisoned by a detachment of the 40th Foot. The remainder of the 40th under Lieutenant Colonel Musgrave (who also has the 2nd Light Infantry Battalion and a detachment of artillery under command), are fighting a delaying action against Washington’s approaching rebel division.
 Above: As Grant wheels to the left, Mathew’s Foot Guards (along with one of Grant’s battalions), advance to screen the right flank from Smallwood’s approaching column of Maryland and New Jersey Militia regiments.
 Above: The small Hussar detachment of the Queen’s Rangers (here represented by the 17th Light Dragoons) remain in reserve at the crossroads.
 Above: The large British battery remains silent, as its front is still masked by the 2nd Light Infantry Battalion. Unfortunately we didn’t have any hills available on the day of the game, so you’ll have to imagine that the guns are on a rise, while Musgrave’s detachment (visible just beyond the fence-line) are on another rise. The skirmishers and limber are in a shallow valley between the two.
 Above: Grant’s brigade has begun to engage Greene’s rebels.
 Above: However, Grant suddenly realises that he is significantly outnumbered! Greene’s column consists of Muhlenberg’s, Weedon’s and Woodford’s Virginia Brigades and McDougal’s Connecticut Brigade, as well as Smallwood’s militia brigade on the flank!
 Above: Mathew’s Guards are ordered to deal with Smallwood’s militia as quickly as possibly and then wheel to engage Greene’s main force.
 Above: At last, Musgrave finally pulls his detachment back into the valley, exposing the advancing rebels to the full power of the Royal Artillery!
 Above: On the other side of the town, Washington’s left flank (Hampton’s 2nd Pennsylvania Brigade) has begun to engage Grant’s left flank (49th Foot & 1st Light Infantry). The 40th Foot are also taking pot-shots at the passing rebels from the Chew House.
 Above: As the British guns pour fire into Washington’s leading battalions, Grey and and Agnew move forward on either flank.
 Above: Conway’s 3rd Pennsylvania Brigade is crushed by the intense artillery fire, as well as from the 2nd Light Infantry, who are still at close range. Conway rides forward to steady them and is soon joined by Washington himself, but to little avail.
 Above: Hartley’s 1st Pennsylvania Brigade moves up to provide support for Conway’s crumbling battalions.
 Above: On the other side of Germantown, Hampton’s 2nd Pennsylvania Brigade bypasses the Chew House, leaving that strongpoint for Maxwell’s New Jersey Brigade to deal with. However, Hampton’s advance is disrupted by fire from the 40th Foot occupying the house. In response, Maxwell deploys his artillery to suppress the defenders before his assault.
 Above: On the American left, Green’s lead battalions are now heavily engaged with Grant’s brigade.
 Above: At the head of Green’s column, the riflemen of the 14th Virginia Regiment are bested by the Queen’s Rangers and fall back behind the formed lines of Weedon’s brigade.
 Above: Another view, looking along the line of Grant’s brigade toward Germantown.
 Above: Grant’s brigade is fighting hard, but Green keeps throwing ever-increasing numbers of troops into the battle. Unable to maintain their skirmish line in this increasingly unequal battle, the Queen’s Rangers fall back behind Grant’s line.
 Above: Hampton’s 2nd Pennsylvania Brigade charges the British line at Germantown!
 Above: Although things seem to be going well for Greene on the eastern side of Germantown, on the western side, Washington is facing stiff resistance from increasing numbers of British infantry, backed up by very strong artillery. Two of Conway’s Pennsylvanian regiments have already been broken and the rest are being hammered by British fire. However, Washington still has another two brigades uncommitted to the battle, including his best troops, the Maryland and Delaware Continentals.
 Above: The view from the British side. Musgrave’s detachment is still managing to hold its ground in the centre, while Grey’s brigade in the foreground, moves to cross the stream and outflank Washington’s column. In the distance, Agnew’s Brigade moves forward through Germantown, aiming to relieve the detachment of the 40th Foot, who are still holding out at the Chew House, despite the best efforts of Maxwell’s New Jersey Brigade.
 Above: On the eastern side of Germantown, Grant is spread very thin, as his left flank is now assaulted by Hampton’s Pennsylvanians, while his right is simultaneously attacked by Greene’s Virginians.
 Above: The Queen’s Rangers Hussars (represented by the 17th Light Dragoons) move to support the threatened right flank. Howe also rides over to assess the situation for himself.
 Above: As the Queen’s Rangers’ skirmish line falls back, the 55th Foot desperately cling onto possession of a small copse on Grant’s right flank. However, they are taking heavy losses and can’t hope to hold on much longer against these odds. The rest of Grant’s brigade is now taken under fire by newly-arrived American artillery.
 Above: On the extreme right flank, Mathew’s Foot Guards Brigade has successfully broken and thrown back Smallwood’s militia, but is now at risk of being outflanked and cut off from the rest of the army.
 Above: Despite heavy losses in his leading brigade, Greene’s column still has plenty of fresh troops to spare and continues its inexorable advance. In front of him, Grant’s redcoats are starting to crumble. But with Washington struggling at Germantown, will this be enough to roll up the British right wing and save the day?