

 Following our last ACW game , the Battle of Cedar Mountain, I had some very positive feedback from none other than Rich Hassenauer, author of the Fire & Fury family of rules. He liked what I’d done with his old Fire & Fury 1st Edition scenarios and asked if we’d be interested in playtesting some of the new, improved scenarios for Brigade Fire & Fury 2nd Edition. Of course, the answer was a resounding “Yes please!” and so he sent me a draft copy of his revised scenario for the Battle of Champion Hill, which will be appearing in the new Great Western Battles Scenario Book (2nd Edition).
As in the original Great Western Battles Scenario Book, Champion Hill can be played as a full scenario or as a smaller scenario, concentrating on the most intense part of the fighting around Champion Hill itself. Rich wanted us to test the smaller of the two scenarios (which is a good job, as I don’t yet have enough troops painted to play the full scenario!).

Major General Ulysses S Grant
Ordinarily at this point, I would present a detailed map of the battlefield and orders of battle for both sides, but as we’re testing Rich’s scenario, I will instead just recommend that readers buy the new book when it comes out! 🙂
In a nutshell, General Ulysses S Grant’s Union Army of the Tennessee, in late April 1863 crossed the Missippi River downstream of the Confederate stroghold of Vicksburg. He marched west to the strategically-important railway junction of Jackson and there defeated the Confederate army of General Joseph E Johnston (commander of all Confederate forces in the region). With the threat to his flank neutralised, Grant marched his army back west, to besiege Vicksburg on the banks of the Mississppi.

Lieutenant General John C Pemberton
However, another Confederate force, consisting of three divisions under the command of General John C Pemberton, had been ordered by Johnston to engage Grant’s army. Pemberton disagreed with his orders, deciding that this would be a suicide mission and instead ordered his army to engage the Union supply trains. However, a second order, repeating the first order in forceful terms, arrived from Johnston and Pemberton had no choice but to go along with his commander’s wishes.
Reversing his march, Pemberton was alarmed to discover that his army was actually using the same road as the Union forces and his advanced guard (Stevenson’s Division) very quickly encountered the Union advanced guard at Champion Hill, which was the highest point on the road along which both armies were marching.
With Sherman’s XV Corps left behind to cover the rear at Jackson, Grant now ordered McPherson’s XVII Corps to launch a direct assault on the Confederates on Champion Hill. McClernand’s XIII Corps meanwhile, was ordered to attack the Confederate right flank, but to proceed cautiously due to the broken terrain, lack of intelligence on the enemy positions and high potential for ambush…

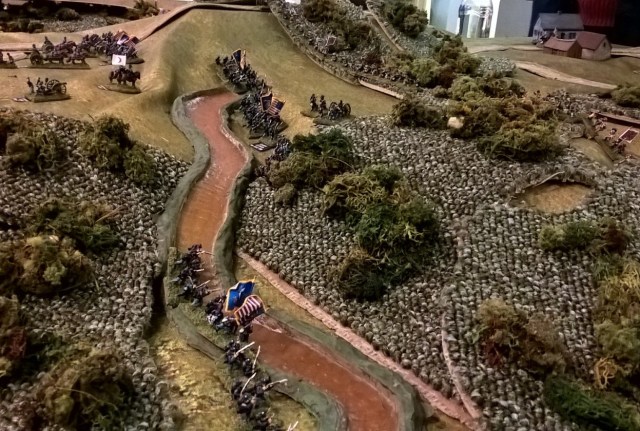
Once again, this game was played at the Carmarthen Old Guard club, using my 10mm figures and my diabolical carpet-tile terrain (I really must finish making those trees…). The map for this scenario is rather complex, so I chopped up some old terrain boards from our 2008 Angola demo game to create the required long ridge, with spurs extending from both sides. The ‘bare bones’ of the terrain therefore looks like this:

We were also very fortunate in being joined by some new club-members and Fire & Fury veterans, Peter Williams and John Watts. They very kindly brought with them a large collection of beautiful 10mm figures and buildings. We used their buildings in the game, but as I’d already organised and labelled my troops, we stuck with mine for this game. Peter and John joined Tom Kitchen on the Confederate side, while Alan Davison and Andy James took the Union forces. Once again, Alan sadly had to leave early for work, so I took over his Union troops at that point. Hopefully I could make a better show of it than last time…

Above: General McPherson, commanding the XVII Corps, passes the Champion House. In front of him is Hovey’s Division from XIII Corps, which has been placed under McPherson’s command. These first few photos were taken by a friend who even printed off a modern photo of the Champion Hill battlefield to use as a backdrop! He doesn’t like them, so refused to let me name him on here, but they’re A LOT better than my pathetic mobile phone photos!

Above: Hovey’s division consisted of Slack’s (here represented by the Zouaves) and McGinnis’ Brigades, plus two batteries of artillery. Note that there were historically no Zouave units involved in this battle; I’d simply maxed out my collection and was forced to use them in lieu of troops with standard Union uniforms (McGinnis’ brigade here has two command stands for the same reason – I’d run out of ordinary infantry stands)! McPherson also has Crocker’s Division marching up behind him, but still some way distant and not scheduled to arrive until Turn 8.

Above: A gratuitous close-up of the unhistorical Zouaves… Well I like them…

Above: And so to my rubbish photos… On Hovey’s right is Logan’s Division of XVII Corps, consisting of the brigades of Leggett (left), J E Smith (centre) and Stevenson (right), plus three batteries of artillery. Stevenson’s Brigade was placed far out on the right flank and one battery was deployed a very long way forward; just off-camera to the right.
 Above: A wider view of the Union right wing, showing Stevenson’s Brigade in the woods on the extreme right flank and Battery ‘D’ of the 1st Illinois Artillery deployed well forward and perilously close to the Confederate lines.

Above: Way off beyond Hovey’s left flank, the advance guard of Osterhaus’ Division of McClernand’s XIII Corps (Garrard’s Brigade) is skirmishing with the Confederate right flank-guard (Jackson’s Brigade). Despite an overwhelming superiority in numbers, Osterhaus has been ordered to advance cautiously and as a consequence, the scenario severely limits his actions until Turn 8 or until Jackson’s brigade is swept away by the advance of McPherson’s XVII Corps. Osterhaus also has Lindsey’s Brigade and two batteries of artillery following on behind, but these are similarly limited by McClernand’s cautious orders.

Above: Beyond Champion Hill, Pemberton sets up his HQ at the Roberts House.
 Above: Straddling Champion Hill, Stevenson’s Confederate Division is deployed on a wide frontage: Centred on Wadell’s Battery at the crest of the hill, Cumming’s Brigade is deployed on the right, with his right flank refused to link with Jackson’s Brigade (seen earlier) forming the flank-guard.
 Above: S D Lee’s Brigade (seen here) is deployed on the left of Champion Hill, lining the edge of the woodland, facing Logan’s Union Division.

Above: Barton’s Brigade forms Stevenson’s left flank-guard in the wooded valley, with Corput’s Battery in support at the Austin House.
 Above: McPherson wastes no time in urging his troops forward into the assault! Supported by four batteries of artillery, Logan’s Division surges forward to take on S D Lee’s Brigade on the edge of the wood. However, Stevenson’s Brigade (in the foreground), well away from the watchful eyes of senior officers, struggles to make headway through the soggy woodland on the right flank.

Above: The first attack on Champion Hill falters as first the Union artillery fails to cause significant damage on S D Lee’s Confederates and then McGinnis’ and J E Smith’s Brigades are all halted by the devastating weight of return fire from the treeline. Leggett’s Brigade manages to charge home, but gets the worst of the melee and is thrown back in disorder.

Above: Logan moves forward to rally Leggett’s men as they lick their wounds and prepare to charge again. At the crest of Champion Hill, Pemberton’s headquarters flag is glimpsed through the trees as he moves forward for a better view of the action.

Above: On the Union right flank, Stevenson’s Brigade proves extremely reluctant to move forward to engage Barton in the dense woodland.

Above: On the other side of Champion Hill, Slack’s Brigade moves forward through the woods and is soon engaged in a sharp firefight with Cumming’s Rebels.

Above: Following the failed Union charge, the Union artillery starts to take Lee’s Confederate Brigade to task, forcing Lee to fall back from the edge of the woodland. Wadell’s Confederate Battery is also silenced by the Union guns and falls back to the critical crossroads (the key piece of terrain on the Rebel side of Champion Hill). The Union infantry are soon surging forward once again, with McGinnis, Leggett and Smith again charging Lee. On the western flank of the battle, Stevenson is finally persuaded to engage Barton.

Above: Lee’s Confederate Brigade pours withering fire into McGinnis’ and Leggett’s Brigades, once again halting their charge. However, J E Smith’s boys weather the storm and carry their bayonets into the woods. Lee suffers heavy casualties from return fire and Smith’s Brigade strikes hard, utterly routing Lee’s Rebels! As the Rebels flee back past the crossroads, Smith’s jubilant troops charge after them, heedless of the danger…

Above: However, despite their victory against S D Lee and the deep breakthrough in the centre, the battle for the flanks has not gone the Union’s way. On the right, Stevenson has been repulsed by Barton and on the left, Slack has been repulsed by Cumming!

Above: Pemberton manages to rally the remnants of S D Lee’s Brigade at the Cabins, but Logan urges Smith to charge on and smash Lee’s Rebels utterly! Lee’s boys still haven’t had the opportunity to replenish their ammunition pouches, but nevertheless manage to disorder Smith’s brigade with musketry. However, Lee is disordered in turn and the combat is close…
 Above: To Logan’s horror and disbelief, Smith’s now-depleted brigade is thrown back by Lee’s resurgent Rebels!
Above: McGinnis’ Brigade meanwhile, moves up to the edge of the woodland, immediately overlooking the objective crossroads (and Waddell’s Battery). Victory is within McPherson’s grasp!
 Above: However, on McGinnis’ left, Cumming’s Rebels are still holding the opposite slope of Champion Hill, while Slack’s worn Union Brigade is reluctant to have another crack until reinforcements arrive.

Above: McGinnis’ Brigade moves out to take the objective crossroads for the Union! From this point forth, all Confederate manoeuvre rolls would suffer a -1 modifier until they recaptured the crossroads )at which point the penalty would pass to the Union side and so on). Waddell’s Battery had already withdrawn to re-deploy near the Roberts House, where it was soon joined by Langan’s freshly-arrived battery and Cockrell’s Brigade from Bowen’s division. J E Smith’s Brigade meanwhile, was pulling back into the woods, all the time under fire from from Lee’s resurgent Rebel Brigade and Corput’s Battery.
 Above: Union celebrations were extremely short-lived, as Cockrell’s fresh Confederate brigade charged the crossroads! After a bitter and closely-fought combat, McGinnis was pushed grudgingly back into the woodland.

Above: In the meantime, further reinforcements arrive for Bowen’s Confederate Division, in the form of Green’s Brigade and Lowe’s Battery. The Confederates soon establish a powerful base of fire at the Roberts House, which dominates the crossroads. McPherson attempts to establish a Union battery at the crest of Champion Hill, but this is immediately silenced and forced to retire.
 Above: In the centre, J E Smith’s brigade mills about in confusion at the wood’s far edge as it is steadily crushed by the weight of fire from Lee’s vengeful brigade and supporting artillery. McGinnis’ Brigade is also suffering as Cockrell’s Rebels charge again and throw McGinnis back, deep into the woods and well away from the critical crossroads.

Above: On the far eastern flank of the battle, everyone had almost forgotten about the ‘Mexican Stand-Off’ between Osterhaus’ Union Division and Jackson’s tiny Rebel brigade. But at long last, it was finally Turn 8 and Garrard’s Brigade, with Lindsey’s Brigade in close support, was free to join the battle! A devastating charge saw Jackson’s tiny command utterly annihilated. Osterhaus’s Division charged on toward the rear of Cumming’s Rebel Brigade, though they had now become visible to the Rebel batteries at the Roberts House, who quickly swung their guns around to enfilade the advancing Union troops. Osterhaus meanwhile ordered his two batteries to move forward as soon as they could, in order to take the Rebel guns under fire.
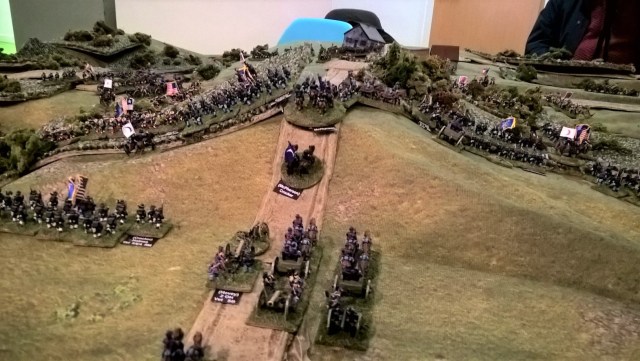
Above: The timely arrival of Crocker’s Division sees the pendulum swing back to the Union as Crocker shores up McPherson’s flagging command. Crocker immediately launches Sanborn’s Brigade into the assault, driving straight up the road onto Champion Hill and joining Slack’s depleted brigade in a charge on Cumming’s persistent Rebel brigade. Holmes’ Brigade follows up behind Sanborn. Three more batteries of artillery also arrive, but at present they can do little except wait for an opportunity to move forward.

Above: Crocker also sends Boomer’s Brigade to the right flank, to assist Stevenson in his ongoing fight against Barton’s extremely persistent Rebel brigade.

Above: On the Confederate right flank, Cumming’s heroic brigade, already outflanked by Osterhaus, finally breaks in the face of an overwhelming combined charge by Slack and Sanborn. As the Rebels break and run for the safety of the gun-line and Buford’s newly-arrived brigade, the jubilant Union infantry swarm forward to once again take the crossroads. However, the Confederate artillery is swift to exact vengeance and soon subjects the advancing Bluebellies to a withering hail of fire.

Above: With the Union left wing halted by the weight of Confederate artillery fire, Pemberton throws Loring’s fresh division into the attack. Loring’s charge succeeds in driving back Slack, Sanborn and Osterhaus’ artillery and recaptures the crossroads once again. However, Osterhaus’ infantry holds firm and then outflanks and punishes Buford’s Brigade.
 Above: Crocker quickly rallies Sanborn’s Brigade and throws them back down the hill against Green’s Brigade, which is now occupying the crossroads. The Union artillery meanwhile, gallops forward and desperately unlimbers atop Champion Hill, in an effort to establish a battery to counter the Confederate Grand Battery at the Roberts House.

Above: Alas, Union hopes are dashed as Sanborn’s battered brigade is routed. Holmes’ fresh brigade attempts to move forward but is crushed by the weight of fire from the Confederate guns.

Above: On the Confederate left flank, Barton’s Brigade continues to frustrate the Bluebellies. Stevenson’s Brigade has been steadily getting the worst of the ongoing firefight, and is now joined by Leggett’s worn brigade, but it’s still not enough. Behind them, McGinnis is joined by Boomer in attacking through the woods, in an attempt to reach the crossroads, but they can make little headway against dogged Confederate resistance.

Above: Back at the Roberts House, Pemberton is alarmed by the sudden appearance of Union troops emerging from the woods on the right flank of the Grand Battery! This fresh Union formation is Carr’s Division of McClernand’s XIII Corps. The Confederate gunners frantically limber up their guns and drive them to safety…
However, it’s all too little, too late… McPherson’s XVII Corps is a spent force and Pemberton is able to re-align his artillery and uncommitted reserves to face McClernand’s XIII Corps and at the end of the scenario, the crossroads, despite having change hands four times, is firmly in Rebel hands.
It was a very near-run thing and a cracking scenario that would definitely reward a replay!
My thanks to Rich Hasenauer for kindly allowing us to test the scenario and my thanks again to the Carmarthen Old Guard play-testers: Andy James, Alan Davison, Tom Kitchen, Peter Williams and John Watts.
The models are all Pendraken 10mm figures from my own collection. The buildings are mostly Timecast Models from Peter Williams’ collection.
Very nice indeed
https://www.10mm-wargaming.com/
Take care
Andy
Thanks Andy! Much appreciated.
Excellent report. I really must dig out my 15mm ACW and try 2nd Edition
Cheers Andy! I don’t think you’ll be disappointed – we really enjoy it.