
 As discussed in the previous article in this series, I’m presently building 10mm armies for the American Civil War, starting with the orders of battle for the 1st day at Gettysburg (1st July 1863).

General Buford
The latest formation to be painted is Brigadier General John Buford’s 1st Division of the Cavalry Corps of the Army of the Potomac. When the war started, John Buford was serving as a regular U.S. Army cavalry captain. Being originally from secessionist Kentucky, the Governor of that state appealed personally to Buford for him to join the Confederacy. However, Buford refused and remained true to his U.S. Army commission. Buford quickly proved himself to be a talented cavalry commander and rose almost immediately to the rank of Brigadier-General. He was firmly an advocate the use of ‘dragoon tactics’ and dismounted skirmish lines and had little time for the beau sabreurs such as Custer, though nevertheless was absolutely not averse to mounted shock-action when necessary.
 On 1st July 1863, General Buford’s cavalry were operating as the flank guard and reconnaissance force for General Reynolds’ Army Wing (I, XI & XII Corps) when they detected a very strong Rebel force (the corps of A.P. Hill and Ewell) advancing on the town of Gettysburg.
Buford immediately realised the significance of that town’s strategic location, being the hub for a large number of good roads and also appreciated the highly defensive nature of the ground. Although heavily outgunned, he ordered his two brigades and horse battery to make a stand west of the town, while requesting urgent assistance from General Reynolds’ I Corps, thus setting in motion the events that would lead to the most significant battle of the American Civil War.
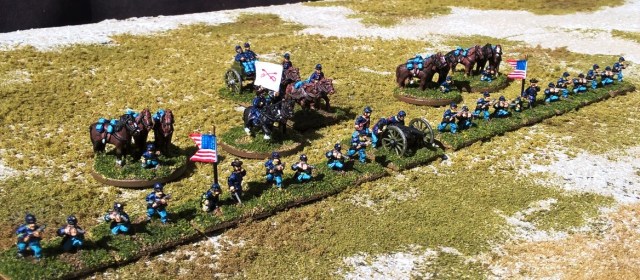
 Above: The 1st Cavalry Division saddled up. Colonel William Gamble’s 1st Brigade (pictured on the right) was the stronger of the two brigades, comprising the 8th New York, 8th & 12th Illinois and 3rd Indiana Cavalry Regiments. totalling a little over 1,600 men (8 bases in Fire & Fury). Colonel Thomas C. Devin’s 2nd Brigade, comprising the 6th & 9th New York, 3rd West Virginia and 17th Pennsylvania Cavalry Regiments, was slightly weaker at a little over 1,100 men (6 bases).
Lt John Calef’s Battery ‘A’ of the 2nd U.S Artillery Regiment provided heavy fire support with its 3-inch Ordnance Rifles. At Gettysburg, Lt Calef’s battery provided superb support to the cavalrymen, deploying well forward and at considerable personal risk to the gunners.
Missing from the picture is Brigadier General Wesley Merrett’s Reserve Brigade, which comprised mainly regular U.S. Cavalry Regiments. The brigade was not present on 1st July, though played a direct part in the battle a few days later.
The figures are by Pendraken. Note that I unwisely depicted Buford, in line with Mort Kuenstler’s paintings (see above), on a black horse. However, I’ve just discovered that his horse at Gettysburg was called ‘Grey Owl’ and was white/grey! Aargh!
 Above: The division deploys for dismounted action. Note that in Fire & Fury, every fourth cavalry base becomes a horse-holder stand when the unit dismounts. Consequently, Gamble here has six deployed dismounted cavalry bases and two horse-holder stands, while Devin has five dismounted cavalry bases and one horse-holder stand.
Buford’s HQ flag is the source of some debate. I’ve gone with the version shown in ‘Civil War Battle Flags’ by General C. McKeever, which conforms to the usual pattern of the corps symbol (in this case crossed sabres) being depicted in red, white and blue for the 1st, 2nd and 3rd divisions respectively. Other depictions show a red-over-white pennant with ‘1’ in reversed colours, as shown in the painting above.
I should also add some minor criticisms of Pendraken’s otherwise excellent figures here… Firstly, there are only two cavalry poses, which is rather boring. Second, there is no dismounted command; I’ve therefore used infantry officers and a horse-holder converted to a guidon-bearer. Third, the dismounted cavalrymen are for some reason modelled with thigh-length sack-coats when the mounted versions have the short jacket issued to Union mounted troops. Thankfully at this scale, this sort of thing is easily hidden by a paint-job.
 Above: I may as well add a quick photo of some markers that I’ve also recently painted up, which are used to indicate unit status in Fire & Fury. The casualty figures indicate that a unit is disordered, while the loading figures indicate that the unit is low on ammo. The wrecked guns somewhat obviously indicate that a battery is damaged/depleted.
The best thing about these markers is that they’ve finally provided me with a use for all the useless loose-change I always end up with after European holidays! The Loading markers are based on 1 Euro-Cent pieces, while the Disorder markers are on 2 Cent pieces and the guns are on 5 Cent pieces. 🙂
The first Confederate division is just nearing completion, so more soon!
Looking good. Though I confess, if I was modelling ACW and the large armies of the period, I would probably use 6mm. Still, only another few thousand to do before you can refight Gettysburg
Yeah, that’s what they’re saying down the at club, but I can’t abide 6mm for anything other than WW2 dogfighting. The other issue I’d have is that the bases are fiddly enough as it is, so wouldn’t want to go any smaller, so that would mean more figures per base.
Considering that I originally started this project in 15mm, 10mm is still a considerable improvement in space, time and expense. 🙂
And I like the models. 🙂
Ah cavalry, still need to venture there for my collection. Having looked at the options in 15/18mm even there the dismounted troopers can be found in different uniforms to the mounted versions in the same ranges.
Yours look great by the way.
We use two gun models per battery so just remove one gun to represent a damaged battery. Reminds me I need some casualty figures too…
Tony.
Cheers Tony! Good tip re damaged batteries.